From Day 0 to 0day Chapter 1

Introduction
Taint Analysis
Life is not like water. Things in life don’t necessarily flow over the shortest possible route Haruki Murakami - 1Q84
Taint analysis (or source and sink analysis ) is the analysis of the flow of input through a program from sources to sinks .
It relies on a simple idea: a large number of vulnerabilities occur because attacker controlled input (the source) flows to a dangerous function (the sink). If the input modifies other variables along the way, these variables become “tainted” and are included in the analysis.
If the code later uses those tainted variables to modify others, those variables are also tainted, and so on. This is known as taint propagation.
Buffer Overflow
In my laptop with or without -fstack-protector it display stack smashing detected so it detect buffer overflow when i run a exploit script
Applying Taint Analysis
First, identify the source.
For what is see here the user not directly controls input, but we have to function the main who use argc and argv (who are really not used in the code), and the second function handleClient who use a variable passed to parameters who is call in main function. The variable clientSocket is used two time in the code and where we have problem is line 19 .
while ((bytesRead = recv(clientSocket, buffer, MAX_BUFFER_SIZE, 0)) > 0) Next, identify the sink, a dangerous function that could cause negative
outcomes like memory corruption if an attacker controls its inputs
This is line 20
memcpy(finalBuffer + offset, buffer, bytesRead);
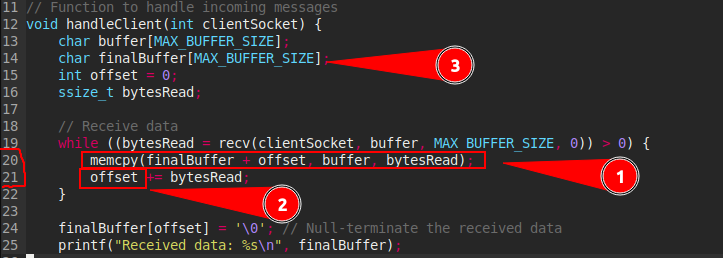 1 - Is the variables who is incremented and increase the memory allocated.
2 - It the line who create a buffer overflow due to the memory copy done here.
3 - It’s the where the problem born with the limited buffer size.
- Now in main function :
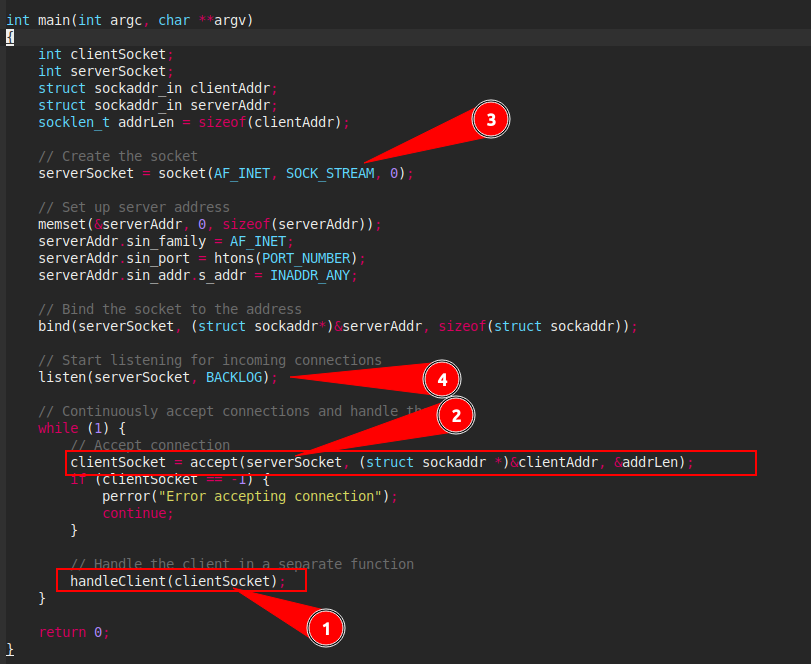
1- The vulnerable function is used only one time, but the variable passed to parameters not.
2- The clientSocket variable is used for accept value from connection create in (3)
3 - The connection is create here and is listen in (4)
4 - The connection is listen here , the value is send to connection waiting like input , and the value is send to handleClient .
So the exploit code is here :
import socket
host = socket.gethostname()
port = 1234
s = socket.socket(socket.AF_INET, socket.SOCK_STREAM)
s.connect((host, port))
s.sendall(b'A' * 1024)
s.close()
Result: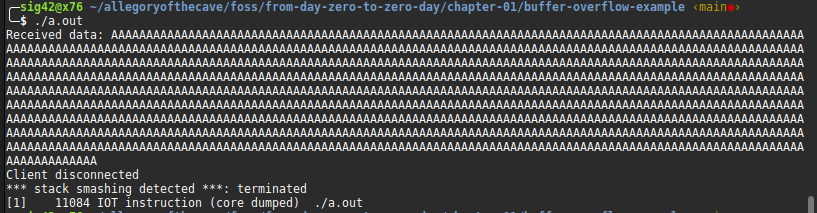
Applying Taint Analysis
First, identify the source. This should be the output of a function that retrieves and stores attacker-controlled input.
bytesRead = recv(clientSocket, buffer, MAX_BUFFER_SIZE, 0)
Next, identify the sink, a dangerous function that could cause negative outcomes like memory corruption if an attacker controls its inputs.
memcpy(finalBuffer + offset, buffer, bytesRead);
We must trace the flow of tainted variables from the first to the last.
Any others variables who is affected by a tainted variable is also tainted . This can conduct to path explosion .
Path explosion refers to the fact that the number of control-flow paths in a program grows exponentially (“explodes”) with an increase in program size and can even be infinite in the case of programs with unbounded loop iterations (Source Wikipedia).
This makes it impossible, or at least extremely time-consuming, to apply taint analysis to all possible paths in a complex target.
We have here 70 lines so we not worry about path explosion.
Sink-to-Source Analysis
Don’t forget that controlled input (the source) flows to a dangerous function (the sink).
Liveoverflow video helped me to make a summary of any things (https://youtu.be/ZaOtY4i5w_U)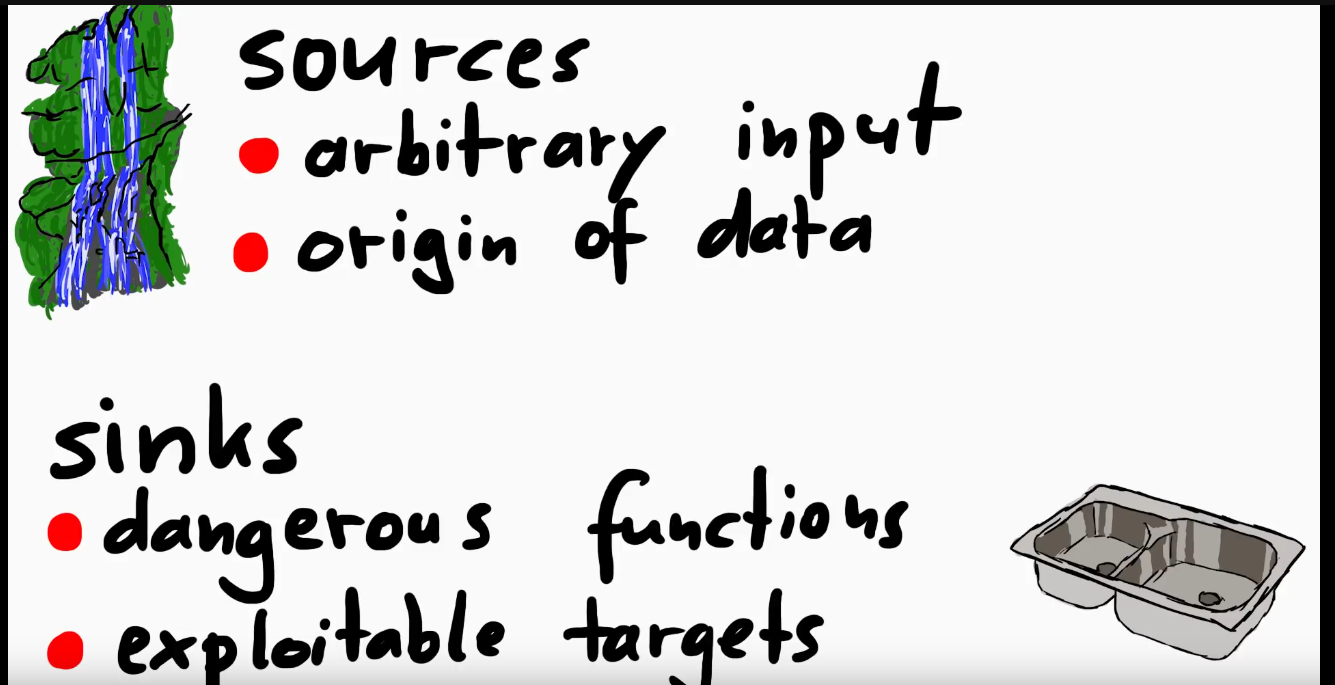 While the source-to-sink approach favors completeness, sink-to-source analysis favors selection.
As you saw, taking the most obvious route in taint analysis, starting from input sources and working your way through the code,
leads to exponentially branching paths of tainted variables that are impossible to follow.
While the source-to-sink approach favors completeness, sink-to-source analysis favors selection.
As you saw, taking the most obvious route in taint analysis, starting from input sources and working your way through the code,
leads to exponentially branching paths of tainted variables that are impossible to follow.
Summary 0
While the source-to-sink approach favors completeness, sink-to-source analysis favors selection.
Source-to-sink analysis favors completeness: This approach starts from all potential sources of data (user input, network connections, file reads) and traces how that data propagates through the system until it reaches sinks (database queries, file writes, display to user, command execution). The goal is to identify all possible paths that data can take, even if they are very indirect. This is crucial for finding vulnerabilities where untrusted data could eventually reach a sensitive operation without proper sanitization or validation. Because it aims to be exhaustive, it might generate more “false positives” (paths that are theoretically possible but might not be exploitable in practice).
Sink-to-source analysis favors selection (or relevance): This approach starts from a specific sink (a sensitive operation that you want to protect) and traces backward to identify what sources could feed data into that sink. The goal here is to determine which inputs could influence a particular sensitive operation. This is useful for prioritizing analysis, focusing on the most critical parts of the code, and reducing the number of irrelevant findings. It’s more targeted and thus “selective.”
Total :Source-to-sink: “Where can this potentially bad data go?” (Broad, comprehensive)
Sink-to-source: “What data can influence this sensitive operation?” (Targeted, selective)
Choosing the Right Sinks
The first step is to select the sink patterns that you want to work backward from. You can refer to banned function lists maintained by other developers to discover common dangerous sinks and how to exploit them. or example, Microsoft actively updates the list of banned functions that it integrates in its code analysis tools Microsoft baneed function.
In addition to the standard library functions like memcpy, analyze the
source code carefully to identify wrapper functions that may help simplify
your analysis. Developers often append _copy or _memcpy to the names of these
wrapper functions.
Wait, wait, what is wrappers ?
The term “wrapper” in computer science, and specifically in programming, refers to a piece of code (which can be a function, a class, or even an entire program) that “encapsulates” or “wraps around” another piece of code, a data structure, or an external system.
Think of it like this:
- A gift wrapper: You wrap a gift to make it look nicer, protect it, and provide a convenient way to present it. The wrapper itself isn’t the gift, but it makes the gift more presentable and manageable.
- A universal adapter for electronics: You have a device with a specific plug, and you want to use it in a country with different outlets. A universal adapter “wraps” the device’s plug, allowing it to connect to the new outlet without changing the device’s original plug.
Ex :
def my_simple_wrapper(func):
    def inner_function(*args, **kwargs):
        print(f"Calling function: {func.__name__}")
        result = func(*args, **kwargs)
        print(f"Finished calling function: {func.__name__}")
        return result
    return inner_function

def greet(name):
    return f"Hello, {name}!"

# Manually wrapping the function
wrapped_greet = my_simple_wrapper(greet)
print(wrapped_greet("Alice"))
Output:
Calling function: greet
Finished calling function: greet
Hello, Alice!
Another factor in deciding which wrapper functions to include in your
analysis is how many times the functions are used. If they include too much
custom logic that applies only to rare cases, they cease to be useful.
By Example if a wrapper function is used (is call) only once in all codebase it not important. As a general rule, consider wrapper functions as sinks when they’re reused extensively relative to the total size of the codebase.
Filtering for Exploitable Scenarios
After selecting your sinks, begin tracing the flow of tainted variables backward from the sinks.
Null dereference: When the code tries to access data at an invalid null
address, leading to crashes. For memcpy, this occurs when dest or src is a null pointer.
Buffer overflow: When the code writes beyond the size of dest. This
can occur when n is larger than the size of dest.
Information leak: When the code reads data from addresses that is not
intended to be exposed. This occurs when n is larger than src.
Memory corruption: When the code makes unintended changes to
memory, which can occur if dest and src overlap.
Ex :
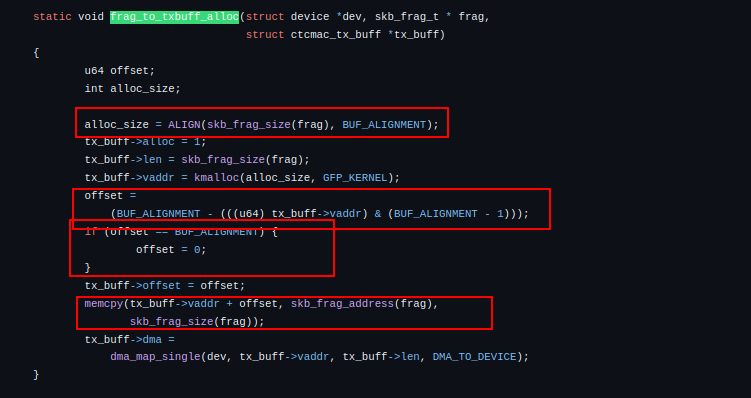
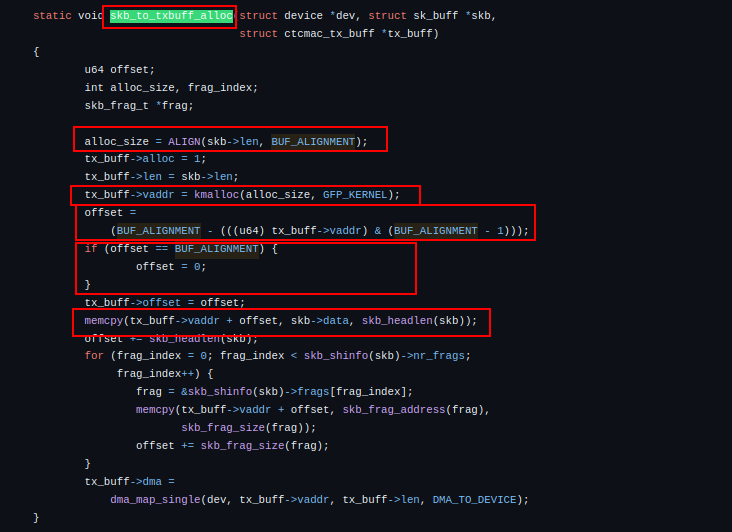
On platform/centec-arm64/tsingma-bsp/src/ctcmac/ctcmac.c (on local) or sonic-buildimage-old-commit .

- 5 : Starting from the first argument,
tx_buff->vaddr + offset(5) , which corresponds to the destination buffer formemcpyfunction .
void *memcpy(void dest[restrict .n], const void src[restrict .n], size_t n);
# on man memcpy
- 2 : Work backward to where
tx_buff->vaddris first assigned the return value ofkmalloc(alloc_size, GFP_KERNEL)(2) This warrants greater attention because kmalloc allocates kernel memory, corruption of which could be devastating.
void * kmalloc(size_t size, int flags)
1 : The size of the buffer allocated to
tx_buff->vaddrisalloc_size, set by the cryptic macroALIGN(skb->len, BUF_ALIGNMENT)(1) .3 : Before figuring out what this macro does, examine the value assigned to offset (3 ), which also appears in the first argument to
memcpylater on.4 : Because the ((
u64)tx_buff->vaddr) & (BUF_ALIGNMENT - 1) bitwise AND operation (&) ensures that the result has a maximum value ofBUF_ALIGNMENT - 1, offset must range from 1 toBUF_ALIGNMENT. The next if conditional block 1 moves this range down to 0 toBUF_ALIGNMENT - 1, since it will be reassigned the value0if it equalsBUF_ALIGNMENT. In short, the destination address formemcpyranges from
tx_buff->vaddr to tx_buff->vaddr + (BUF_ALIGNMENT - 1).
in (5) .
Additionally, because the buffer at tx_buff->vaddr is of size
ALIGN(skb->len, BUF_ALIGNMENT) on (2), or at least BUF_ALIGNMENT bytes, it isn’t possible for tx_buff->vaddr + offset to exceed the allocated buffer.
Thus, you can safely ignore the first argument to the memcpy call in your taint analysis because it will never be dangerous by itself. Instead, focus on the third argument, which determines the number of bytes copied into the buffer and could potentially cause an overflow.
This process demonstrates a big advantage of sink-to-source analysis:
By checking whether a sink is exploitable from the beginning, you can decide which paths are relevant instead of chasing down every rabbit hole.
Furthermore, eliminating one potential attack vector at the sink allows you to eliminate similar patterns elsewhere.
For example, because the same memcpy(tx_buff->vaddr + offset, ...); pattern appears in frag_to_txbuff_alloc and skb_to_txbuff_alloc, you can skim those instances instead of repeating the analysis. Remember that sink-to-source tracing prioritizes selection, while source-to-sink tracing prioritizes completeness.
frag_to_txbuff_alloc
skb_to_txbuff_alloc
Fortunately, not all instances of filtering sinks require as much depth.
Consider the following instances of memcpy in platform/barefoot/bfn-modules/modules/bf_tun.c :
memcpy(cmd, &tun->link_ksettings, sizeof(*cmd));
It uses sizeof to ensure the number of bytes copied into the cmd buffer matches its size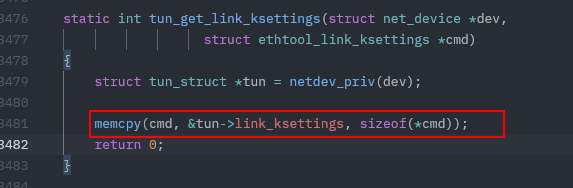
memcpy(filter->addr[n], addr[n].u, ETH_ALEN);
It uses a fixed constant value for the number of bytes and thus is not attacker-controllable. Observe how many false positives you can filter out by locating all instances of
 memcpyin the code, then removing instances of non-vulnerable uses ofmemcpy.
╭─sig42@x76 ~/Downloads/sonic-buildimage/src ‹bcf5388f2●›
╰─$ grep -r "memcpy" --include=\*.{c,cpp} . | wc -l
237
This command searches all files with a .c or .cpp file extension for
the memcpy string, returning 237 results.
Next, tweak the regular expression to match instances of memcpy that
don’t use a constant for the third argument, based on the assumption that
constant values either are numeric or have variable names in all capital
letters:
╭─sig42@x76 ~/Downloads/sonic-buildimage/src ‹bcf5388f2●›
╰─$ grep -r "memcpy(.*,.*, [a-z]" --include=\*.{c,cpp} . | wc -l
97
This regex uses [a-z] to ensure that the third argument starts with a lowercase letter, returning 97 results. This cuts down the number of results you have to manually analyze by more than half!
Next, filter out instances where the third argument is sizeof(dest):
╭─sig42@x76 ~/Downloads/sonic-buildimage/src ‹bcf5388f2●›
╰─$ grep -r "memcpy(.*,.*, [a-z]" --include=\*.{c,cpp} . | grep -v "memcpy(.*,.*,\s*sizeof(" | wc -l
54
As shown here, instead of overcomplicating the regex, you can simply
pipe the results of the first grep command to a second grep command, which
uses the -v option to filter out results that match the regex pattern.
The pattern finds memcpy calls whose third argument starts with sizeof(, disregarding
any leading spaces. (space beetween *, and [a-z]) .
For manual code review, focus your time and energy on quickly filtering out non-exploitable scenarios to speed up sink-to-source tracing.
Confirming Exploitability
Taking note of additionnal non-exploitable functions like strlen or sizeof used in third parameters of memcpy . This means that the number of bytes copied likely matches the size of the destination buffer.
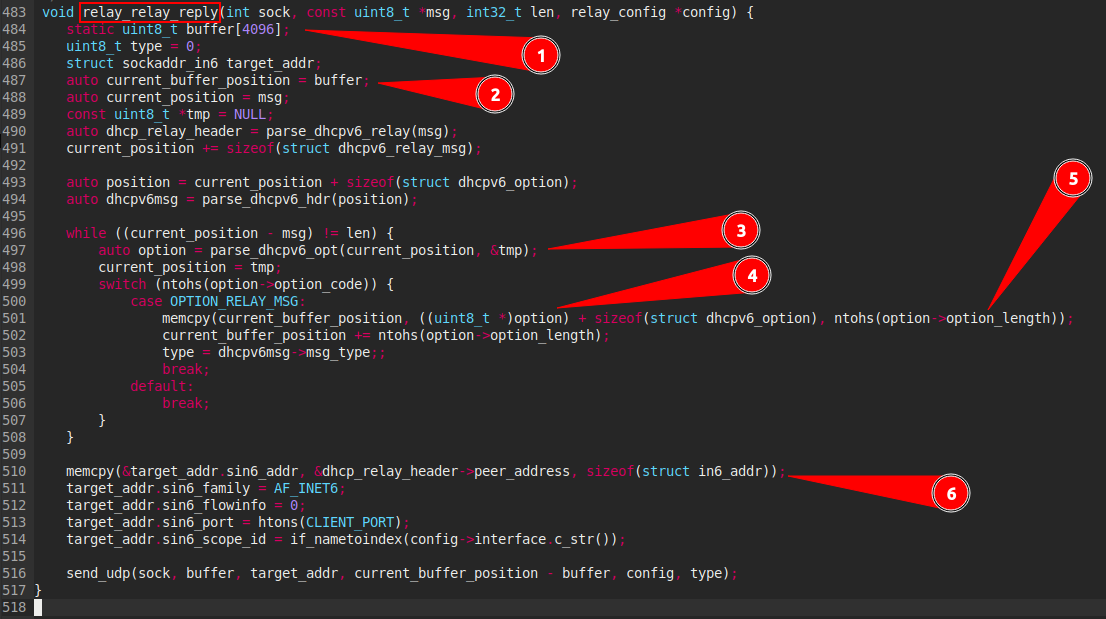
- 6 : Here the six is not exploitation because of the previous exclusions because of exclusion i talk previously.
- 4 : For know if the buffer overflow is exploitation here it’s important to determine the size of
current_buffer_position, her last value was assigned to line (2)auto current_buffer_position = bufferandbufferwas declared to line (1)static uint8_t buffer[4096], know we know that the destination buffer has a fixed size 4096 bytes - 5 : Here the problem is that it can provoke a buffer overflow if her value is superior of the size of (4), the
ntohsfunction converts the unsigned short integernetshortfrom network byte order to host byte order. Continue tracing back fromoption-optin_length, we can see that theoptionis set by the functionparse_dhcpv6_opt. This function is defined earlier in the file:

- The buffer variable is parser by a
dhcpv6_optionstruct who is defined insrc/dhcp6relay/src/relay.h
struct dhcpv6_option {
	uint16_t option_code;
	uint16_t option_length;
};
The type of option_length is uint16_t who is a (unisgned short integer) with 65535 for max value.
Noted that we can choose the value used by
option->option_length but the value of buffer destination (current_buffer_position) is fixed to 4096.
So this function is exploitable .
Identifying an Attacker-Controlled Source
After finding an exploitable sink pattern, work backward in the code to con- firm if it is reachable from an attacker-controlled source. At this point, you’ve confirmed three important points in the taint flow:
- A sink exists at the first
memcpycall in therelay_relay_reply function. - This sink is exploitable if
option->option_lengthis larger than 4096. - The
option->option_lengthparameter has a maximum value of 65535.
Now making sure there are no exploit-killing sanitization or validation steps along the way. Before the memcpy we have a switch case :
- The switch case execute this part of code if
ntohs(option->option_code)), in thesrc/dhcp6relay/src/relay.hfile reveals thatOPTION_RELAY_MESSAGEcorresponds to9. - The
optionvariable is a instance ofdhcpv6_optionstruct parsed from the bytes at thecurrent_positionpointer while(current_position - msg) != len.
auto option = parse_dhcpv6_opt(current_position, &tmp);
Why ? because of parse_dhcpv6_opt is a function who return a dhcpv6_option struct and also because option have option_code and option_length.
╭─sig42@x76 ~/Downloads/sonic-buildimage ‹bcf5388f2●›
╰─$ grep -A 10 "dhcpv6_option" src/dhcp6relay/src/relay.h
struct dhcpv6_option {
    uint16_t option_code;
    uint16_t option_length;
};
msgargument is a pointer to the DHCPv6 message header position and thelenargument is the size of data received (Refer to function annotation).- Moreover,
current_positionis initialized as msg and incremented by the size of a dhcpv6_relay_msg struct:
current_position +=sizeof(struct dhcpv6_relay_msg).
parse_dhcpv6_opttakescurrent_positionas its first argument.current_positionis a pointer (const uint8_t *) that indicates the beginning of the bytes to be interpreted.As the
relay_relay_replyfunction progresses through the received message,current_positionis updated to point to the beginning of the next option or the next data segment to be processed. This is the role ofcurrent_position = tmp;after the call toparse_dhcpv6_opt.The
current_positionpointer does not point to a separate copy of the message. It points directly into the originalmsgthat was passed as an argument to therelay_relay_replyfunction.msgis the raw buffer that contains the entire DHCPv6 message received from the network. Therefore,current_positionis simply an offset (an advanced pointer) within this initialmsg.you can deduce that current_position during
parse_dhcpv6_optis located in themsgbytes at this offsetPacket Schema
msg                                     current_position                                              len
------------------------------------------------------------------------------------------------------
| dhcpv6_relay_msg         |  dhcpv6_option        |  dhcpv6_msg    |                  |             |
+----------------------------------------------------------------------------------------------------+
- After determining that the attacker must control
msg(the second argument torelay_relay_reply) to reach the vulnerablememcpy, look for calls torelay_relay_replyto determine the source of the second argument.
This function is only used in one function on server_callback
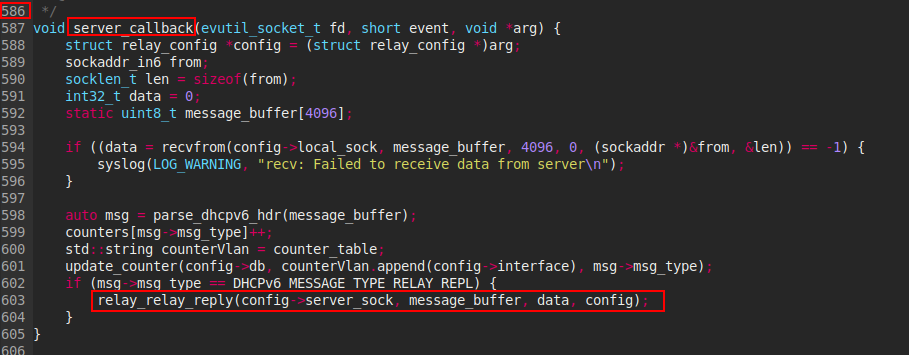
The variable message_buffer is passed to second argument of relay_relay_reply, but for reached the memcpy in if statement , it crucial to control the msg variable who fortunately have message_buffer who was be affected to msg.
After that we can see the line containing the first if statement who reads data directly from the network socket (config->local_sock) and stores it into message_buffer. And the config variable contain arg argument passed to server_callback function.
Confirming a Reachable Attack Surface
We need to confirm whether the source itself is reachable by an attacker.
We know that recvfrom function open socket and copy data to config->local_sock
from message_buffer .
Multiple possibility are offer here, by example a remote attacker can access to socket when recvfrom is open .
╭─sig42@x76 ~/Downloads/sonic-buildimage/src ‹bcf5388f2●›
╰─$ grep -ni "config->local_sock" dhcp6relay/src/relay.cpp
317:    interface_config->local_sock = *local_sock;
573:    relay_client(config->local_sock, current_position, ntohs(udp_header->len) - sizeof(udphdr), ip_header, ether_header, config);
594:    if ((data = recvfrom(config->local_sock, message_buffer, 4096, 0, (sockaddr *)&from, &len)) == -1) {
719:        config->local_sock = local_sock;
The sustainable line here is on line 719 because in the others line the config->local_sock in parameters.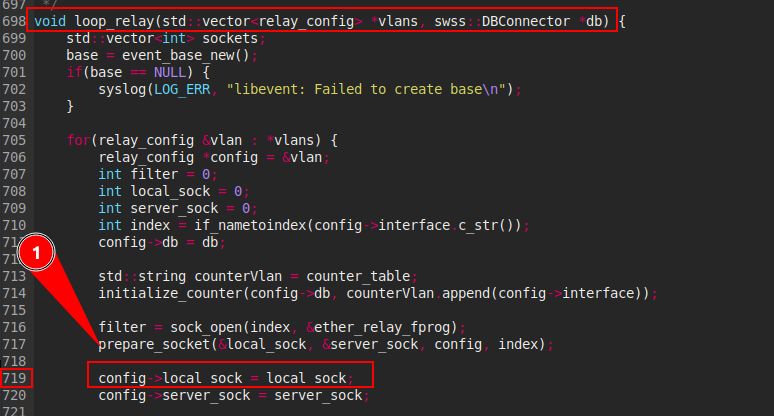 And in this line we can see that a value (
local_sock) is affected to config->local_sock and before this affectation the prepare_socket function is used and local_sock value is passed to parameter.

In this code portion we can see that local_sock socket is opened and the port is assigned to in6 sockaddr_in6 address struct.
The RELAY_PORT as 547 like value is specified in src/dhcp6relay/src/relay.h .
After observation you can conclude that the vulnerable source-to-sink path exists for any IPv6, non-link-local network interface address on port 547.
Testing the Exploit
However, confirming a vulnerability purely through code review won’t suffice. You need to build a working proof of concept that produces a controllable crash.
To build the PoC, you need to first develop a test environment. Without a working build of the target to test your exploit against, you can’t confirm the vulnerability.
It’s also helpful to be able to quickly debug your initial proof-of-concept exploits in case something breaks along the way.
I prefer to build container images to encapsulate PoCs because it provides a consistent environment to experiment in and makes it portable for
others to verify the exploit.
We need Docker / Podman for do this.
But before we need to know how to build the program locally before to build her image and run the container.
For building the program check the README and install all dependency, but it’s probably to meet other problem during building. So hesitate to copy, paste
the error on google .
When run make we see this:
First problem
#12 0.287 src/relay.cpp:3:10: fatal error: event.h: No such file or directory
3 | #include <event.h>
   |
^~~~~~~~~
compilation terminated.
This error meaning you need to install a shared library that dhcp6relay depends on.
For solve that a simple apt install libevent-dev.
Second Problem
#11 0.328 src/relay.cpp:10:10: fatal error: configdb.h: No such file or
directory
10 | #include "configdb.h"
   |
^~~~~~~~~~~~
compilation terminated.
Searching for configdb.h shows that it belongs to the sonic-swss-common
library, which is referred to in the -I argument in the Makefile.
For this new project we need to build ans install the package yourself, the process to install it is on the README.md file on sonic-swss-common .
Third Problem
After resolve all this dependency on dhcp6relay, we see another problem when we run :
terminate called after throwing an instance of 'std::system_error'
what(): Unable to connect to redis (unix-socket): Cannot assign requested
address
Aborted
It appears that dhcp6relay is attempting to connect to a Redis server. If
you analyze configInterface.cpp, one of the source files for dhcp6relay, you’ll
see that it checks the DHCP_RELAY table in the CONFIG_DB database for a dhcpv6_servers field name.
Further research into this configuration setting leads to documentation
written by a SONiC developer SONiC-DHCPv6-Relay (He need a account) that contains the expected structure of this configuration setting in the database.
After resolving this requirement by adding the expected configuration
to the Redis database, dhcp6relay finally runs but it doesn’t bind to any interfaces because none of them contain non-link-local IPv6 addresses, as
prepare_socket requires.
Rather than creating a brand new interface, you can piggyback off an existing one through a virtual local area network (VLAN), then add the required fixed IPv6 addresses.
By definition, link-local IPv6 addresses fall in the range fe80::/10, and
thus any valid address within this range works.
Setup ?
File : add_ipv6_addresses.sh
/etc/init.d/redis-server restart
ip link add link eth0 name vlan type vlan id 3
ip -6 addr add fe80::20c:29ff:fe90:14c5/64 dev vlan
ip -6 addr add 2a00:7b80:451:1::10/64 dev vlan
ip link set vlan up
redis-cli -n 4 HSET "DHCP_RELAY|vlan" dhcpv6_servers "fe80::20c:29ff:fe90:14c5/64"
The Dockerfile
FROM ubuntu:20.04
# Install dependencies
ENV DEBIAN_FRONTEND=noninteractive
RUN apt update
RUN apt install -y autoconf-archive build-essential dh-exec gdb git iproute2 libboost-dev \
libboost-thread-dev libevent-dev libgmock-dev libgtest-dev libhiredis-dev libnl-3-dev \
libnl-genl-3-dev libnl-nf-3-dev libnl-route-3-dev libpython2.7-dev libpython3-dev \
libtool pkg-config python3 redis-server swig3.0
# Check out repo
RUN git clone https://github.com/sonic-net/sonic-buildimage
WORKDIR sonic-buildimage
RUN git checkout bcf5388
# Build and install sonic-swss-common
RUN git submodule update --init src/sonic-swss-common
WORKDIR src/sonic-swss-common
RUN ./autogen.sh
RUN ./configure
RUN make
RUN make install
RUN ldconfig
# Build dhcp6relay
WORKDIR ../dhcp6relay
RUN sed -i '8s/$/ -g/' Makefile
RUN sed -i '24s/.*/\t$(CC) $(CFLAGS) -o $(DHCP6RELAY_TARGET) $(OBJS) $(LIBS) $(LDFLAGS)/' \
Makefile
RUN make
# Configure redis
RUN sed -i '109s/# / /' /etc/redis/redis.conf
RUN sed -i '109s/\/var\/run\/redis\/redis-server.sock/\/var\/run\/redis\/redis.sock/' \
/etc/redis/redis.conf
RUN sed -i '110s/# / /' /etc/redis/redis.conf
RUN sed -i '110s/700/755/' /etc/redis/redis.conf
# Copy add ipv6 address script
COPY add_ipv6_addresses.sh add_ipv6_addresses.sh
RUN chmod +x add_ipv6_addresses.sh
COPY exploit.py /tmp/exploit.py
# copy add ipv6 address script
COPY add_ipv6_addresses.sh add_ipv6_addresses.sh
RUN chmod +x add_ipv6_addresses.sh
Place this Dockerfile in a folder with the add_ipv6_addresses.sh script.
Now build and run it with:
$ docker build -t dhcp6relay .
$ docker run -it --cap-add=NET_ADMIN --sysctl net.ipv6.conf.all.disable_ipv6=0 dhcp6relay
Finally, run the script and start dhcp6relay :
root@8928b41ace8c:/sonic-buildimage/src/dhcp6relay# ./add_ipv6_addresses.sh
Stopping redis-server: redis-server.
Starting redis-server: redis-server.
(integer) 1
root@8928b41ace8c:/sonic-buildimage/src/dhcp6relay# ./dhcp6relay
Building the Proof of Concept
You must send bytes that match the dhcpv6_relay_msg and dhcpv6_option
structs, as src/dhcp6relay/src/relay.h defines :
The link_address and peer_address members of the dhcpv6_relay_msg struct
are of the in6_addr struct type, which is not a custom struct defined in relay.h
but instead a shared type from the Linux operating system itself
(see ipv6 man).
This struct contains a single unsigned char s6_addr[16] member.
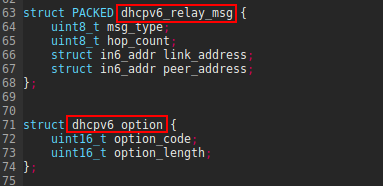 Note that the
 dhcpv6_relay_msg struct definition includes the PACKED attribute, which means that the compiler doesn’t add padding between the
struct’s members to align with memory boundaries.
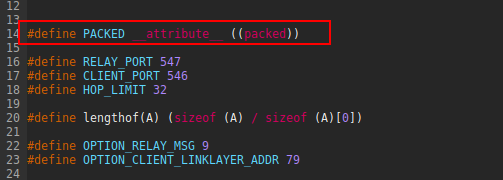 Without this attribute, the compiler might, for example, add 3 or 7 bytes between
 msg_type and hop_count to align with 4- or 8-byte boundaries, depending on whether the target is a 32 or 64-bit system.
After confirming the data structures, recall the specific requirements for these bytes to reach the vulnerable sink:
- When parsed into a
dhcpv6_msgstruct, the payload’smsg_typemember must equalDHCPv6_MESSAGE_TYPE_RELAY_REPL. - The payload must include at least one dhcpv6_option struct after the dhcpv6_relay_msg struct. (See Packet Schema )
- When parsed into a
dhcpv6_optionstruct, theoption_codemember must equalOPTION_RELAY_MSG(9).
You can re-create the bytes matching these requirements using the socket and struct libraries. In particular, the pack function converts values (such as strings or integers)
The sink-to-source analysis revealed that the vulnerability lay in an overly
large option_length being used as the size of a memcpy to a 4,096-byte destination buffer, so set option_length to the maximum 65535 value and add additional overflow bytes to the end of the payload. Since dhcp6relay converts the
values of option_code and option_length from network to host byte order, convert these values to network byte order first using socket.htons.
Next, rebuild the container image and start a new session:
$ docker build -t dhcp6relay .
$ docker run -it --cap-add=NET_ADMIN --sysctl net.ipv6.conf.all.disable_ipv6=0 dhcp6relay
root@743a13d9862c:/sonic-buildimage/src/dhcp6relay# ./add_ipv6_addresses.sh
Stopping redis-server: redis-server.
Starting redis-server: redis-server.
(integer) 1
root@743a13d9862c:/sonic-buildimage/src/dhcp6relay# ./dhcp6relay
Start a second interactive session by listing the running containers and starting bash in the current one:
$ docker exec -it 743a13d9862c bash
root@743a13d9862c:/sonic-buildimage/src/dhcp6relay# python3 /tmp/exploit.py
You should observe a segmentation fault in your first session when you
run dhcp6relay:
root@743a13d9862c:/sonic-buildimage/src/dhcp6relay# ./dhcp6relay
Segmentation fault
To perform a quick triage of the crash, debug dhcp6relay using gdb , run the program on gdb with run command and check where the vulnerability appears with backtrace.
Reviewing each step in discovering CVE-2022-0324 demonstrated the key principle of selection in the sink-to-source tactic.