Toboggan
Toboggan is a modern, multi-platform presentation system built in Rust. Write your slides in Markdown or TOML, serve them via a WebSocket-enabled server, and present from any client — web browser, terminal, desktop app, or mobile device.
Inspiration
The name Toboggan comes from the French word for slides (as in a slide deck). It's a project originally started by Igor Labori (@ilaborie), which I took over to advance and evolve into the multi-platform system it is today.
Inspired by the Italian animated series Huntik, Toboggan lets you become a Seeker of knowledge. Your presentations are your Titans — powerful, dynamic, and under your control.
Features
- Simple content creation — Write presentations in Markdown or TOML
- Real-time synchronization — Multi-client sync via WebSocket
- Multi-platform clients — Web, terminal, desktop, iOS, embedded
- Zero external dependencies — Just a single binary per component
Quick start
# 1. Start the server with a presentation (TOML file or markdown folder)
toboggan-server examples/demo.toml
toboggan-server ./my-slides/              # directory of markdown files

# 2. Open the web UI
#    → http://localhost:8080

# 3. Control from the terminal
toboggan-tui http://localhost:8080

# Convert a markdown folder to a TOML talk file
toboggan-cli ./my-slides/ -o my-talk.toml
Installation
Download pre-built binaries
Get the latest release from github.com/Tednoob17/toboggan/releases.
Each file is named by platform:
| File | Platform |
|---|---|
toboggan-cli-linux-amd64 | Linux x86_64 |
toboggan-server-linux-amd64 | Linux x86_64 |
toboggan-tui-linux-amd64 | Linux x86_64 |
toboggan-desktop-linux-amd64 | Linux x86_64 (desktop GUI) |
*macos-amd64 | macOS (Intel) |
*macos-arm64 | macOS (Apple Silicon) |
*windows-amd64.exe | Windows x86_64 |
*.deb | Debian / Ubuntu packages |
Linux
# Download
curl -sSfL https://github.com/Tednoob17/toboggan/releases/latest/download/toboggan-cli-linux-amd64 -o toboggan-cli

# Make executable and install
chmod +x toboggan-cli
sudo mv toboggan-cli /usr/local/bin/
Repeat for toboggan-server, toboggan-tui, and toboggan-desktop as needed.
macOS
# Intel Mac
curl -sSfL https://github.com/Tednoob17/toboggan/releases/latest/download/toboggan-cli-macos-amd64 -o toboggan-cli

# Apple Silicon Mac
curl -sSfL https://github.com/Tednoob17/toboggan/releases/latest/download/toboggan-cli-macos-arm64 -o toboggan-cli

chmod +x toboggan-cli
sudo mv toboggan-cli /usr/local/bin/
Windows (PowerShell)
curl.exe -sSfL https://github.com/Tednoob17/toboggan/releases/latest/download/toboggan-cli-windows-amd64.exe -o toboggan-cli.exe
# Move to a directory in your PATH
Debian / Ubuntu
Download individual .deb packages:
curl -sSfL https://github.com/Tednoob17/toboggan/releases/latest/download/toboggan-cli_0.1.0-1_amd64.deb -o toboggan-cli.deb
curl -sSfL https://github.com/Tednoob17/toboggan/releases/latest/download/toboggan-server_0.1.0-1_amd64.deb -o toboggan-server.deb
curl -sSfL https://github.com/Tednoob17/toboggan/releases/latest/download/toboggan-tui_0.1.0-1_amd64.deb -o toboggan-tui.deb
sudo dpkg -i toboggan-cli.deb toboggan-server.deb toboggan-tui.deb
sudo apt-get install -f
Build from source
Prerequisites
| Component | Requires | Notes |
|---|---|---|
| CLI + server + TUI | Rust (stable) | Main workspace |
| Desktop app | Rust + GPU drivers | Separate workspace |
| Web frontend | Rust + Node.js + wasm-pack + WASM target | Optional, server works without it |
1. Install Rust
curl --proto '=https' --tlsv1.2 -sSf https://sh.rustup.rs | sh
rustup target add wasm32-unknown-unknown
2. Install wasm-pack
Do not use
cargo install wasm-pack(very slow). Use the pre-built binary instead.
Linux (x86_64):
curl -sSfL https://github.com/rustwasm/wasm-pack/releases/download/v0.15.0/wasm-pack-v0.15.0-x86_64-unknown-linux-musl.tar.gz \
  -o /tmp/wasm-pack.tar.gz
tar -xzf /tmp/wasm-pack.tar.gz -C /tmp/
cp /tmp/wasm-pack-v0.15.0-x86_64-unknown-linux-musl/wasm-pack ~/.cargo/bin/
wasm-pack --version
macOS (Intel):
curl -sSfL https://github.com/rustwasm/wasm-pack/releases/download/v0.15.0/wasm-pack-v0.15.0-x86_64-apple-darwin.tar.gz \
  -o /tmp/wasm-pack.tar.gz
tar -xzf /tmp/wasm-pack.tar.gz -C /tmp/
cp /tmp/wasm-pack-v0.15.0-x86_64-apple-darwin/wasm-pack ~/.cargo/bin/
wasm-pack --version
macOS (Apple Silicon):
curl -sSfL https://github.com/rustwasm/wasm-pack/releases/download/v0.15.0/wasm-pack-v0.15.0-aarch64-apple-darwin.tar.gz \
  -o /tmp/wasm-pack.tar.gz
tar -xzf /tmp/wasm-pack.tar.gz -C /tmp/
cp /tmp/wasm-pack-v0.15.0-aarch64-apple-darwin/wasm-pack ~/.cargo/bin/
wasm-pack --version
Windows: Download the .exe from the releases page and add it to your PATH.
3. Install Node.js
Required for building the web frontend. Install via nvm or from your package manager:
node --version  # needs 18+
npm --version
4. Build everything
What does
--releasemean? Rust has two build profiles:
- Debug (
cargo build): compiles fast, runs slow — good for development- Release (
cargo build --release): compiles slow (minutes), runs fast — good for final useWe use
--releasebelow for the final binaries. For quick testing, you can omit it.
# Clone
git clone https://github.com/Tednoob17/toboggan
cd toboggan

# Build CLI + server + TUI (main workspace)
cargo build --release

# Build desktop app (separate workspace)
cargo build --release --manifest-path toboggan-desktop/Cargo.toml

# Build web frontend (optional — server works without it)
cd toboggan-web/toboggan-wasm
wasm-pack build --target web --release
cd ..
npm install
npm run build
cd ..

# Rebuild server with web UI embedded (required after web frontend build)
cargo build --release -p toboggan-server
Build outputs
After building, your binaries are at these paths:
| Component | Default path |
|---|---|
toboggan-cli | target/debug/toboggan-cli (debug) or target/release/toboggan-cli (release) |
toboggan-server | target/debug/toboggan-server or target/release/toboggan-server |
toboggan-tui | target/debug/toboggan-tui or target/release/toboggan-tui |
toboggan-desktop | target/debug/toboggan-desktop or target/release/toboggan-desktop |
| WASM output | toboggan-web/toboggan-wasm/pkg/ |
| Web frontend (built) | toboggan-web/dist/ (embedded into server binary at compile time) |
Note: The server embeds the web frontend. If you change the frontend code, you must rebuild the server (
cargo build -p toboggan-server) to see the changes.
Or use the build script
./scripts/build-web.sh
This automates all the steps above and checks that prerequisites are installed.
Troubleshooting
For common issues (wasm-opt errors, missing dependencies, server placeholder, TUI connection problems), see the Troubleshooting page.
Creating Presentations
Toboggan talks are stored as TOML and can be generated from Markdown/HTML source folders with toboggan-cli.
Step-by-step: create your first presentation
1. Create a new file
touch my-talk.toml
2. Write the presentation header
title = "My First Talk"
date = "2026-05-30"
footer = "Demo footer"
These are the core Talk fields serialized by toboggan-core.
3. Add slides
Each slide is a [[slides]] entry. Slides appear in the order you write them.
[[slides]]
kind = "Part"

[slides.title]
type = "Text"
text = "Introduction"
A Part slide acts as a section divider.
[[slides]]
kind = "Standard"

[slides.title]
type = "Text"
text = "Welcome!"

[slides.body]
type = "Text"
text = "This is my first slide. Toboggan supports Markdown-like text content."
4. Add more slides
[[slides]]
kind = "Standard"

[slides.title]
type = "Text"
text = "Key Points"

[slides.body]
type = "Text"
text = "- First point\n- Second point\n- Third point"

[[slides]]
kind = "Standard"

[slides.title]
type = "Text"
text = "Code Demo"

[slides.body]
type = "Html"
raw = "<pre><code class=\"language-rust\">fn hello() { println!(\"Hello Toboggan!\"); }</code></pre>"
alt = "Rust code example"

[[slides]]
kind = "Standard"

[slides.title]
type = "Text"
text = "Thanks!"

[slides.body]
type = "Text"
text = "Thank you for watching!"
5. Run the server
toboggan-server my-talk.toml
Open http://localhost:8080 in your browser to see your presentation.
Full example
title = "My Talk"
date = "2026-05-30"

[[slides]]
kind = "Part"

[slides.title]
type = "Text"
text = "Part 1"

[[slides]]
kind = "Standard"

[slides.title]
type = "Text"
text = "Welcome!"

[slides.body]
type = "Text"
text = "Hello world!"

[[slides]]
kind = "Standard"

[slides.title]
type = "Text"
text = "Styled Slide"

[slides.style]
classes = ["centered"]
style = "background: #2d3436; color: #dfe6e9;"

[[slides]]
kind = "Part"

[slides.title]
type = "Text"
text = "Part 2"

[[slides]]
kind = "Standard"

[slides.title]
type = "Text"
text = "With Notes"

[slides.body]
type = "Text"
text = "Slide content here"

[slides.notes]
type = "Text"
text = "Speaker notes — only visible in presenter mode"
Progressive reveals (steps)
To reveal content incrementally within a single slide, wrap each chunk in a <div class="step step-N">:
[[slides]]
kind = "Standard"

[slides.title]
type = "Text"
text = "Progressive Example"

[slides.body]
type = "Html"
raw = """
<div class="step step-0">
<h3>First thing to show</h3>
<p>This appears when the slide loads.</p>
</div>
<div class="step step-1">
<h3>Second thing</h3>
<p>This appears on click / next.</p>
</div>
<div class="step step-2">
<h3>Third thing</h3>
<p>This appears on the next click.</p>
</div>
"""
alt = """
## Progressive Example

### Step 1
First thing to show.

### Step 2
Second thing to show.

### Step 3
Third thing to show.
"""
The numbering starts at 0 and increments by 1 for each step. The step_counts in the API response ([0, 2, 1, ...]) tells the client how many steps each slide has (0 = single view, no steps).
Slide fields
| Field | Type | Required | Description |
|---|---|---|---|
kind | string | No | Cover, Part, or Standard |
title | content | No | Slide title content |
body | content | No | Slide body content |
notes | content | No | Speaker notes |
terminals | array | No | Embedded terminal panes |
style | style | No | CSS classes and inline style |
Style fields
| Field | Type | Description |
|---|---|---|
classes | Array | CSS classes applied to the slide |
style | String | Inline CSS |
Notes
[slides.notes]
type = "Text"
text = "Your speaker notes here"
Notes are visible in presenter mode and are not shown to the audience.
Converting Markdown to TOML
If you prefer writing in Markdown:
# Convert a folder of markdown files to TOML
toboggan-cli slides/ -f toml -o presentation.toml
Your folder structure:
slides/
├── 01-intro.md
├── 02-details.md
└── 03-end.md
Each Markdown file becomes a slide. The frontmatter of each file sets the slide metadata:
+++
title = "My Slide"
duration = "1m"
+++

Slide content here...
Example presentations
The repository includes real-world example presentations in the slides_ex/ directory, originally created by Trail of Bits for security conferences:
-
Building Secure Smart Contracts — a folder-based presentation (
slides_ex/presentations/Building Secure Smart Contracts/) ready to be converted with the CLI:toboggan-cli "slides_ex/presentations/Building Secure Smart Contracts/" -o my_talk.toml toboggan-server my_talk.toml -
How to Fuzz Like a Pro — available in two formats:
- TOML (pre-compiled, 51 slides):
toboggan-server "slides_ex/presentations/How to Fuzz Like a Pro/how-to-fuzz-like-a-pro.toml" - Markdown (folder-based, 51 slides — editable individually):
toboggan-server "slides_ex/presentations/How to Fuzz Like a Pro/markdown/"
- TOML (pre-compiled, 51 slides):
These examples demonstrate the project structure and frontmatter conventions used in real talks.
Markdown folder as input
Starting with v0.1.1-beta.2, toboggan-server accepts a directory of Markdown files directly — no TOML conversion needed:
# Serve a folder of markdown slides directly
toboggan-server ./my-slides/

# With public dir for images
toboggan-server ./my-slides/ --public-dir ./my-slides/assets
The folder structure follows the same convention as the CLI input:
my-slides/
├── _cover.md           # title and date metadata
├── _head.html           # custom HTML head injection
├── 01-introduction.md   # individual slides
└── 02-deep-dive/
    ├── _part.md         # section divider
    └── 01-details.md
When a directory is passed, the server parses it on startup using the same parser as toboggan-cli.
CLI Usage
toboggan-cli converts a folder of Markdown/HTML slides into a Toboggan talk file and prints statistics.
Basic usage
# Convert a source folder to TOML
toboggan-cli slides/ -o presentation.toml

# Emit JSON instead
toboggan-cli slides/ -f json -o presentation.json

# List available syntax highlighting themes
toboggan-cli --list-themes
See Troubleshooting for common issues and fixes.
Arguments and options
| Command | Description |
|---|---|
slides/ | Input directory containing your presentation source files |
-o, --output | Output file path (default: stdout) |
-t, --title | Override the talk title |
-d, --date | Override the talk date (YYYY-MM-DD) |
-f, --format | Output format: toml, json, yaml, or html |
--theme | Syntax highlighting theme |
--list-themes | Print the available themes and exit |
--no-counter | Disable automatic part/slide numbering |
--no-stats | Skip the stats summary |
--wpm | Override the speaking rate used for duration estimates |
--exclude-notes-from-duration | Remove speaker notes from duration estimates |
Input layout
The CLI expects a source folder with markdown or HTML files:
slides/
├── _cover.md
├── _footer.html
├── _head.html
├── 01-introduction/
│   ├── _part.md
│   └── 01-welcome.md
└── 02-deep-dive/
    └── 01-details.md
_cover.mdsets the title/date metadata._footer.htmlprovides a custom HTML footer (repeated on every slide)._head.htmlprovides custom HTML to inject into the<head>of the output._part.mdcreates a section divider.- Files are processed in alphabetical order.
- Hidden files (names starting with
.) are ignored.
Frontmatter
Source slides can include TOML frontmatter delimited by +++.
+++
title = "Slide Title"
duration = "5m"
+++

# Slide content
For richer examples and failure modes, see the troubleshooting page.
Troubleshooting
This page collects common issues and how to fix them.
Markdown → TOML conversion
Paths and quoting
- If your input path contains spaces, always quote it:
toboggan-cli "My Slides Folder/" -o presentation.toml
- The CLI expects a directory as input. If you pass a single
.tomlfile or a file path, the CLI will error withNotADirectory(if it's a file) or produce unexpected output — you don't need to convert a TOML file with the CLI.
Frontmatter format
- The CLI parses TOML frontmatter delimited with
+++(three pluses). Example:
+++
title = "Slide Title"
duration = "5m"
css = "background: #fff; color: #333;"
+++

Slide content here...
- Malformed TOML frontmatter will be reported in debug logs. If you use YAML frontmatter (
---), convert it to TOML or remove it.
When no slides are processed
- Ensure files have supported extensions (
.md,.html) and are not hidden (names starting with.). - Use
_cover.mdin the root of the presentation folder to providetitle/datemetadata, or pass--titleand--dateon the CLI.
Debugging and logs
- For detailed parsing errors and diagnostics, run the CLI with debug logging:
RUST_LOG=debug cargo run -p toboggan-cli -- "path/to/slides/" -o out.toml
- If the CLI exits without writing output, check stderr for messages about skipped slides or parsing errors.
Quick checklist
- Is the input a directory? (not a single
.tomlor.mdfile) - Are paths quoted if they contain spaces?
- Are frontmatter blocks
+++TOML or removed? - Are files named with
.md/.htmland not hidden?
Output file errors
- If the CLI fails when writing the output file, make sure the parent directory exists. The CLI uses
File::create(path)which will error if the directory does not exist. Create the target directory first or write to an existing folder:
mkdir -p /tmp/toboggan-output
toboggan-cli "path/to/slides/" -o /tmp/toboggan-output/presentation.toml
Server
Direct markdown folder support
Starting with v0.1.1-beta.2, toboggan-server accepts a directory of Markdown files
directly — no TOML conversion needed:
toboggan-server ./my-slides/

# With static assets
toboggan-server ./my-slides/ --public-dir ./my-slides/assets
The server detects a directory input and parses it the same way toboggan-cli does.
See Creating Presentations for the folder layout.
Server not accessible from other devices
Symptom: The server starts but other devices on the network can't connect (connection refused or timeout).
Cause: By default, toboggan-server binds to 127.0.0.1 (localhost only). This is not reachable from other machines.
Fix: Bind to all interfaces with --host 0.0.0.0:
toboggan-server --host 0.0.0.0 --port 8080 my-talk.toml
"address already in use"
Symptom: The server fails to start on the default port.
Fix: Use a different port or kill the existing process:
# Use a custom port
toboggan-server --port 9090 my-talk.toml

# Or find and kill the process using port 8080
lsof -i :8080
kill <PID>
Talk file errors
Symptom: Server exits immediately with a Talk parse error.
Fix: Validate the talk file:
# Check the talk file loads correctly
toboggan-server my-talk.toml

# Common issues:
# - Missing required fields (title, date)
# - Invalid slide kind (use: Cover, Part, Standard)
# - Content type must be "Text" or "Html" (not bare strings)
Images not showing in slides
Symptom: Slides with <img> tags show broken images.
Cause: The server needs to know where to serve static files from.
Fix: Use --public-dir to point to the folder containing your images:
toboggan-server --public-dir ./public my-talk.toml
Then reference images as /public/my-image.jpg in your slide HTML.
Hot-reload (watch mode) not detecting changes
Symptom: The server's --watch flag doesn't reload when you edit the talk file.
Fix: The watch mode uses filesystem polling. Make sure:
- The file is saved to disk (not just in an editor buffer)
- You're watching the correct file (the one passed to the server)
- Some editors (vim with
set nobackup) may trigger more reliably than others
toboggan-server --watch my-talk.toml
CORS errors in the browser
Symptom: The browser console shows CORS errors when the web UI connects to the server.
Fix: If the web UI is served from a different origin than the server, use --allowed-origins:
toboggan-server --allowed-origins "https://my-cdn.com" my-talk.toml
Or allow all origins for development:
toboggan-server --allowed-origins "*" my-talk.toml
Verify the server is running
# Health check endpoint
curl http://localhost:8080/api/health

# Should return: OK
# If connection refused, the server is not running or bound to a different host/port.
Presentation format
Footer not showing or unwanted footer appears
- The Toboggan UI has a built-in footer bar (
.toboggan-footer). To hide it, inject CSS via theheadfield:
head = """
<style>
  .toboggan-footer { display: none; }
</style>
"""
- The optional
footerfield in the talk header sets a text string in the presentation metadata, not a visual footer.
Slide kind is invalid
Symptom: The server rejects the talk with "unknown variant" for kind.
Fix: Only these slide kinds are valid: Cover, Part, Standard.
# Correct
kind = "Part"

# Wrong — "Section" and "Break" don't exist
Content type must be tagged
Each content block is a typed enum. You can't set body to a raw string:
# Wrong — this will not parse
[slides.body]
text = "Hello"

# Correct — use "type" field
[slides.body]
type = "Text"
text = "Hello"

# Or for HTML content
[slides.body]
type = "Html"
raw = "<h1>Hello</h1>"
Web frontend build
wasm-pack fails with bulk memory errors
Symptom: wasm-pack build fails with:
memory.copy operations require bulk memory operations [--enable-bulk-memory-opt]
Cause: The Rust compiler generates WASM with bulk memory instructions (memory.copy, memory.fill),
but the wasm-opt tool (from binaryen) requires --enable-bulk-memory to process them.
Fix: Replace the wasm-opt binary with a wrapper script that enables the needed WASM features:
# Locate the wasm-opt binary (the * wildcard will match the version folder)
cd ~/.cache/.wasm-pack/wasm-opt-*/bin/
mv wasm-opt wasm-opt.real

# Create a wrapper that injects the required flags
cat > wasm-opt << 'EOF'
#!/bin/bash
exec "$(dirname "$0")/wasm-opt.real" --enable-bulk-memory-opt --enable-nontrapping-float-to-int "$@"
EOF
chmod +x wasm-opt
Then re-run:
wasm-pack build --target web --release
wasm-pack not found
Symptom: command not found: wasm-pack
Fix: Download the pre-built binary (faster than cargo install):
# Linux x86_64
curl -sSfL https://github.com/rustwasm/wasm-pack/releases/download/v0.15.0/wasm-pack-v0.15.0-x86_64-unknown-linux-musl.tar.gz \
  -o /tmp/wasm-pack.tar.gz
tar -xzf /tmp/wasm-pack.tar.gz -C /tmp/
cp /tmp/wasm-pack-v0.15.0-x86_64-unknown-linux-musl/wasm-pack ~/.cargo/bin/
Server shows placeholder instead of the web UI
Symptom: Opening http://localhost:8080 shows a plain page saying "Web UI not built".
Cause: The server embeds the frontend at compile time. If toboggan-web/dist/
doesn't exist when you build the server, it embeds a placeholder.
Fix: Build the web frontend, then rebuild the server:
cd toboggan-web/toboggan-wasm
wasm-pack build --target web --release
cd ..
npm install
npm run build
cd ..
cargo build -p toboggan-server
Or use the provided script:
./scripts/build-web.sh
WebSocket connection retries exhausted
Symptom: The web UI shows "reconnecting..." and eventually gives up.
Fix: If the server is behind a proxy or on a slow network, the frontend's WebSocket retry settings can be adjusted in toboggan-web/.env:
VITE_WS_MAX_RETRIES=10
VITE_WS_INITIAL_RETRY_DELAY=2000
VITE_WS_MAX_RETRY_DELAY=60000
Then rebuild the frontend and server.
TUI client
TUI says "not a terminal"
Symptom: The TUI exits immediately with a "not a terminal" error.
Cause: The TUI uses crossterm which requires a real TTY. This happens
when running in a CI pipeline, a tool sub-shell (e.g. $(...)), or a
detached process.
Fix: Run the TUI in a real terminal (SSH works). If testing, use the web client instead.
TUI can't connect
Symptom: The TUI starts but shows "Connection refused" or "No route to host".
Fix: Make sure the server is running and listening on the right address:
# Check the server is up
curl http://localhost:8080/api/health

# Run TUI with matching host/port
toboggan-tui --host localhost --port 8080
If the server is bound to 0.0.0.0, use the machine's LAN IP to connect from another device:
toboggan-tui --host 192.168.1.42 --port 8080
TUI keyboard shortcuts not working
Symptom: Keys like →, ←, or g don't respond.
Fix: Make sure the terminal is in focus and supports the required key sequences. Some terminal multiplexers (tmux, screen) may intercept arrow keys. Try:
- Running the TUI outside tmux/screen
- Using alternate shortcuts (n = next, p = previous, q = quit)
Server Usage
toboggan-server loads a TOML talk file, serves the browser UI, and keeps all connected clients in sync over WebSocket.
Starting the server
# Basic usage — TOML file
toboggan-server talk.toml

# Basic usage — Markdown folder (v0.1.1-beta.2+)
toboggan-server ./slides/

# Custom host and port
toboggan-server --host 0.0.0.0 --port 9090 talk.toml

# Serve presentation images from a local folder
toboggan-server --public-dir ./public talk.toml

# Enable watch mode
toboggan-server --watch talk.toml
The --public-dir flag serves static files (images, videos, etc.) at the /public/ URL path.
This is useful for embedding images in your slide HTML with <img src="/public/my-image.jpg">.<|end▁of▁thinking|>
Connecting clients
Once the server is running, open any client and point it at the server URL:
| Client | Command / URL |
|---|---|
| Web | http://localhost:8080 |
| TUI | toboggan-tui --host localhost --port 8080 |
| Mobile/Desktop | Configure the server URL in the app |
Web UI note: The browser frontend requires building
toboggan-web(Node.js + wasm-pack). See Web Client build instructions. Without the frontend, the server shows a placeholder page. All API endpoints (/api/talk,/api/ws) work regardless.
HTTP and WebSocket endpoints
| Endpoint | Method | Description |
|---|---|---|
/ | GET | Browser UI assets |
/api/health | GET | Health check |
/api/ws | GET | WebSocket upgrade endpoint |
/api/presentation | GET | Presentation metadata |
Protocol flow
- A client connects to
/api/ws. - The client sends
Registerwith a display name. - The server replies with
Registeredand the initialStatenotification. - Navigation commands (
NextSlide,PreviousSlide,GoTo,First,Last,NextStep,PreviousStep) update the shared state. - The server broadcasts notifications to all connected clients.
Systemd service (Linux)
[Unit]
Description=Toboggan Presentation Server
After=network.target

[Service]
ExecStart=/usr/local/bin/toboggan-server /path/to/talk.toml
Restart=on-failure
User=youruser

[Install]
WantedBy=multi-user.target
Desktop App
The desktop app (toboggan-desktop) provides a graphical user interface
built with Iced and wgpu.
Running
# Launch the desktop app
toboggan-desktop

# It will auto-connect to localhost:8080
# Start the server first, then launch the desktop
Workflow
- Start the server:
toboggan-server my-talk.tomlortoboggan-server ./slides/ - Launch the desktop:
toboggan-desktop - The desktop connects to the server automatically
- Use the desktop to navigate slides
Known behavior
- The desktop app will show "Connection refused" errors if the server is not running — this is normal. Start the server first.
- Built-in GPU-accelerated rendering via Vulkan/OpenGL.
Requirements
- Linux:
libxkbcommon-dev,libwayland-dev,libegl1-mesa-dev,libgles2-mesa-dev - RAM: ~4 GB during compilation, ~128 MB at runtime
TUI Client
toboggan-tui is the terminal client built with ratatui and crossterm.
Requirements
- A real TTY (terminal). Does not work in CI sub-shells or non-interactive contexts.
- Works over SSH, on any Linux/macOS/Windows terminal.
Running
# If installed via pre-built binary or cargo install
toboggan-tui --host localhost --port 8080

# If built from source (binary is in target/debug/ or target/release/)
./target/debug/toboggan-tui --host localhost --port 8080
Controls
| Key | Action |
|---|---|
→ / n | Next slide |
← / p | Previous slide |
q / Ctrl+C | Quit |
g | Go to slide |
r | Refresh / reconnect |
? | Toggle help |
What it’s good for
- Presenting from SSH or a local terminal.
- Controlling a presentation without opening a browser.
- Reusing the same server protocol as every other client.
Web Client
The web client is the browser-facing UI served by toboggan-server.
Accessing
Start the server, then open:
http://localhost:8080
What it does
- Shows the current slide and presentation state in real time.
- Sends navigation commands back to the server.
- Works as the main presenter view from any modern browser.
Building the web frontend
The web frontend is optional. The server works without it (shows a placeholder page and all API endpoints still function). To build the full UI:
Prerequisites
- Rust +
wasm32-unknown-unknowntarget (rustup target add wasm32-unknown-unknown) - wasm-pack (install from pre-built binaries — see installation)
- Node.js 18+
Build steps
Tip: The
--releaseflag makes the WASM build slower (3-5 minutes) but produces smaller, faster files. For quick testing, you can use--devinstead.
# Step 1: Build the WASM crate (Rust → WebAssembly)
cd toboggan-web/toboggan-wasm
wasm-pack build --target web --release

# Step 2: Build the TypeScript frontend (fast, ~1 minute)
cd ..
npm install         # first time only
npm run build       # = tsc && vite build

# Step 3: Rebuild the server to embed the frontend
cd ..
cargo build -p toboggan-server
The server will detect toboggan-web/dist/ at compile time and embed it via rust-embed.
Dev mode (hot reload)
For development, you can run the Vite dev server alongside the Rust server:
# Terminal 1: start the Rust server (TOML file or markdown folder)
cargo run -p toboggan-server -- --host 0.0.0.0 --port 8080 my-talk.toml
cargo run -p toboggan-server -- --host 0.0.0.0 --port 8080 ./slides/

# Terminal 2: start the Vite dev server (auto-reloads on changes)
cd toboggan-web
npm run dev          # runs on http://localhost:8000, proxies /public to :8080
Configuration (.env)
The web frontend reads environment variables at build time from toboggan-web/.env:
| Variable | Default | Description |
|---|---|---|
VITE_API_BASE_URL | location.origin | Base URL for REST API calls (e.g. /api/talk). Set this if the frontend is served from a different origin than the server. |
VITE_WS_BASE_URL | ws://{location.host}/api/ws | WebSocket URL for real-time updates. |
VITE_WS_MAX_RETRIES | 5 | Max WebSocket reconnection attempts. |
VITE_WS_INITIAL_RETRY_DELAY | 1000 | Initial retry delay in ms. |
VITE_WS_MAX_RETRY_DELAY | 30000 | Max retry delay in ms. |
Important: By default
VITE_API_BASE_URLandVITE_WS_BASE_URLare not set, so the frontend useslocation.origin(the same server the page was loaded from). This is correct for most deployments. Only set them if you need to proxy API calls to a different backend.
Changing the API URL for production
If you serve the web UI from a different host than the server (e.g. via a CDN or
reverse proxy), uncomment and edit the relevant lines in toboggan-web/.env:
VITE_API_BASE_URL=http://your-server-ip:8080
VITE_WS_BASE_URL=ws://your-server-ip:8080/api/ws
Then rebuild the frontend:
cd toboggan-web
npm run build
cd ..
cargo build -p toboggan-server
Architecture
toboggan-web/
├── toboggan-wasm/
│   ├── src/lib.rs          ← Rust code compiled to WASM
│   ├── Cargo.toml          ← wasm-pack config
│   └── pkg/                ← generated by wasm-pack
│       ├── toboggan_wasm.js
│       ├── toboggan_wasm_bg.wasm
│       └── toboggan_wasm.d.ts
├── src/
│   └── main.ts             ← imports from ../toboggan-wasm/pkg/
├── dist/                   ← generated by vite build (embedded by server)
├── vite.config.ts
├── tsconfig.json
└── package.json
Android client
This page explains how to build and run the Toboggan Android client.
Prerequisites
- Android Studio (latest)
- Android NDK (25+)
- Rust toolchain and Android targets:
rustup target add aarch64-linux-android armv7-linux-androideabi x86_64-linux-android i686-linux-android
misehelper is used in this repository to orchestrate multi-platform builds (optional).
Build steps (quick)
- From repository root, build the Rust native library and generated Kotlin bindings:
mise build:android
This builds the Rust library for Android ABIs, generates UniFFI bindings, and copies .so and Kotlin files into the Android app app/src/main/ layout.
- Open
toboggan-android/in Android Studio and build/run the app on an emulator or device.
Connecting to the server
- For the Android emulator, use
10.0.2.2:8080to reach the host machine'slocalhost:8080(the app defaults to this address). - For a physical device, update the server URL in
PresentationViewModel.ktto point to the server host (e.g.192.168.1.42:8080).
Notes
- The Android app uses Jetpack Compose and UniFFI-generated Kotlin bindings to the Rust core. If you change Rust APIs, re-run the
mise build:androidstep to regenerate bindings. - If you need to test on multiple ABIs, ensure the
.sofiles are present underapp/src/main/jniLibs/.
Presenting from Any Device
Toboggan's real-time synchronization lets you control presentations from any device on the same network — phone, tablet, laptop, or another computer.
How it works
- Start the server on your main machine
- Find your machine's IP address
- Open any client on any device and point it to the server
Finding your IP
# Linux
ip addr show | grep "inet " | grep -v 127.0.0.1

# macOS
ifconfig | grep "inet " | grep -v 127.0.0.1

# Windows (PowerShell)
ipconfig | findstr "IPv4"
Typically looks like 192.168.1.42 or 10.0.0.5.
Connecting from different devices
From another computer (same network)
# Terminal (TUI)
toboggan-tui --host 192.168.1.42 --port 8080

# No installation needed — use the web UI
# Just open a browser to:
http://192.168.1.42:8080
From a phone or tablet
No app needed! Just open the browser and navigate to:
http://192.168.1.42:8080
This works on iPhone, iPad, Android, and any smartphone.
From iOS (native app)
The toboggan-mobile crate provides native iOS bindings via UniFFI.
Build the Xcode project and run on your iPhone/iPad.
From the internet (not just local network)
To present over the internet, you need to expose the server:
Option A — SSH tunnel (secure, no config)
# On a public server
ssh -R 8080:localhost:8080 user@your-server.com

# Then access from anywhere:
http://your-server.com:8080
Option B — ngrok (quick)
ngrok http 8080
# Then share the ngrok URL with anyone
Option C — Deploy to a VPS
# On your VPS with a public IP (TOML file or markdown folder)
toboggan-server --host 0.0.0.0 --port 8080 talk.toml
toboggan-server --host 0.0.0.0 --port 8080 ./slides/
Then access from anywhere: http://your-vps-ip:8080
Multiple viewers
Toboggan supports unlimited concurrent viewers. Everyone connected to the server sees the same slide in real time. Perfect for:
- Classroom teaching
- Conference presentations
- Remote team meetings
Showcase: Rebuilding Trail of Bits Slides
This page documents how the PDF presentation "How to Fuzz Like a Pro" was rebuilt as a Toboggan TOML slide deck. Each of the 51 PDF pages is rendered as a high-resolution JPEG image and displayed as one slide.
Original PDF
Global configuration
At the top of the TOML file, the presentation title, date, and a custom
<head> injection hide the Toboggan footer bar:
title = "How to Fuzz Like a Pro"
date = "2025-05-31"
head = """
<style>
  .toboggan-footer { display: none; }
</style>
"""
Each PDF page is rendered at 3x zoom (2160×1215 px) using PyMuPDF,
saved as JPEG quality 95. Links and Twitter handles found in the PDF
text are overlaid as clickable <a> elements with percentage-based
positioning. The complete TOML file (880 lines) is at
slides_ex/presentations/How to Fuzz Like a Pro/how-to-fuzz-like-a-pro.toml.
Images are in slides_ex/presentations/How to Fuzz Like a Pro/public/.
Slide 1 — PDF page 1
Content:
1
DeFi Security Summit     |     Building Secure Contracts: Fuzzing like a pro
TOML code:
[[slides]]
kind = "Standard"

[slides.title]
type = "Empty"

[slides.body]
type = "Html"
raw = """
<div style="width:100%;height:100%;position:relative;display:flex;align-items:center;justify-content:center;">
  <img src="public/page_01.jpg" style="max-width:100%;max-height:100%;object-fit:contain;display:block;">
</div>
"""

[slides.notes]
type = "Empty"
Slide 2 — PDF page 2
Content:
2
DeFi Security Summit     |     Building Secure Contracts: Fuzzing like a pro
Building secure contracts:
How to fuzz like a pro
TOML code:
[[slides]]
kind = "Standard"

[slides.title]
type = "Empty"

[slides.body]
type = "Html"
raw = """
<div style="width:100%;height:100%;position:relative;display:flex;align-items:center;justify-content:center;">
  <img src="public/page_02.jpg" style="max-width:100%;max-height:100%;object-fit:contain;display:block;">
</div>
"""

[slides.notes]
type = "Empty"
Slide 3 — PDF page 3
Content:
3
DeFi Security Summit     |     Building Secure Contracts: Fuzzing like a pro
Who am I?
•
Nat Chin (@0xicingdeath)
Trail of Bits: trailofbits.com
◦
We help developers to build safer software
TOML code:
[[slides]]
kind = "Standard"

[slides.title]
type = "Empty"

[slides.body]
type = "Html"
raw = """
<div style="width:100%;height:100%;position:relative;display:flex;align-items:center;justify-content:center;">
  <img src="public/page_03.jpg" style="max-width:100%;max-height:100%;object-fit:contain;display:block;">
  <a href="https://x.com/0xicingdeath" target="_blank" rel="noopener"
     title="x.com/0xicingdeath"
     style="position:absolute;left:25.9%;top:29.9%;width:18.1%;height:5.3%;cursor:pointer;"></a>
</div>
"""

[slides.notes]
type = "Empty"
This slide has a clickable overlay — the URL is extracted from the PDF text and positioned as a transparent
<a>element on top of the image.
Slide 4 — PDF page 4
Content:
4
DeFi Security Summit     |     Building Secure Contracts: Fuzzing like a pro
Agenda
•
How to find bugs?
What is property based testing?
How to define good invariants?
Comparison with similar tools
TOML code:
[[slides]]
kind = "Standard"

[slides.title]
type = "Empty"

[slides.body]
type = "Html"
raw = """
<div style="width:100%;height:100%;position:relative;display:flex;align-items:center;justify-content:center;">
  <img src="public/page_04.jpg" style="max-width:100%;max-height:100%;object-fit:contain;display:block;">
</div>
"""

[slides.notes]
type = "Empty"
Slide 5 — PDF page 5
Content:
5
DeFi Security Summit     |     Building Secure Contracts: Fuzzing like a pro
How to Find Bugs?
/// @notice Allow users to buy token. 1 ether = 10 tokens
/// @param tokens The numbers of token to buy
/// @dev Users can send more ether than token to be bought, to give gifts to the
team.
function buy...
TOML code:
[[slides]]
kind = "Standard"

[slides.title]
type = "Empty"

[slides.body]
type = "Html"
raw = """
<div style="width:100%;height:100%;position:relative;display:flex;align-items:center;justify-content:center;">
  <img src="public/page_05.jpg" style="max-width:100%;max-height:100%;object-fit:contain;display:block;">
</div>
"""

[slides.notes]
type = "Empty"
Slide 6 — PDF page 6
Content:
6
DeFi Security Summit     |     Building Secure Contracts: Fuzzing like a pro
How to Find Bugs?
•
Main techniques
◦
Unit tests
Manual analysis
TOML code:
[[slides]]
kind = "Standard"

[slides.title]
type = "Empty"

[slides.body]
type = "Html"
raw = """
<div style="width:100%;height:100%;position:relative;display:flex;align-items:center;justify-content:center;">
  <img src="public/page_06.jpg" style="max-width:100%;max-height:100%;object-fit:contain;display:block;">
</div>
"""

[slides.notes]
type = "Empty"
Slide 7 — PDF page 7
Content:
7
DeFi Security Summit     |     Building Secure Contracts: Fuzzing like a pro
Full automated - Example
TOML code:
[[slides]]
kind = "Standard"

[slides.title]
type = "Empty"

[slides.body]
type = "Html"
raw = """
<div style="width:100%;height:100%;position:relative;display:flex;align-items:center;justify-content:center;">
  <img src="public/page_07.jpg" style="max-width:100%;max-height:100%;object-fit:contain;display:block;">
</div>
"""

[slides.notes]
type = "Empty"
Slide 8 — PDF page 8
Content:
8
DeFi Security Summit     |     Building Secure Contracts: Fuzzing like a pro
How to Find Bugs?
•
Semi automated analysis
◦
Benefits
▫
TOML code:
[[slides]]
kind = "Standard"

[slides.title]
type = "Empty"

[slides.body]
type = "Html"
raw = """
<div style="width:100%;height:100%;position:relative;display:flex;align-items:center;justify-content:center;">
  <img src="public/page_08.jpg" style="max-width:100%;max-height:100%;object-fit:contain;display:block;">
</div>
"""

[slides.notes]
type = "Empty"
Slide 9 — PDF page 9
Content:
9
DeFi Security Summit     |     Building Secure Contracts: Fuzzing like a pro
What is property based testing?
TOML code:
[[slides]]
kind = "Standard"

[slides.title]
type = "Empty"

[slides.body]
type = "Html"
raw = """
<div style="width:100%;height:100%;position:relative;display:flex;align-items:center;justify-content:center;">
  <img src="public/page_09.jpg" style="max-width:100%;max-height:100%;object-fit:contain;display:block;">
</div>
"""

[slides.notes]
type = "Empty"
Slide 10 — PDF page 10
Content:
10
DeFi Security Summit     |     Building Secure Contracts: Fuzzing like a pro
Fuzzing
•
Stress the program with
random inputs*
◦
Most basic fuzzer: randomly
TOML code:
[[slides]]
kind = "Standard"

[slides.title]
type = "Empty"

[slides.body]
type = "Html"
raw = """
<div style="width:100%;height:100%;position:relative;display:flex;align-items:center;justify-content:center;">
  <img src="public/page_10.jpg" style="max-width:100%;max-height:100%;object-fit:contain;display:block;">
</div>
"""

[slides.notes]
type = "Empty"
Slide 11 — PDF page 11
Content:
11
DeFi Security Summit     |     Building Secure Contracts: Fuzzing like a pro
Property based testing
•
Traditional fuzzer usually for crashes
◦
Smart contracts don’t (really) have crashes
User defines invariants
TOML code:
[[slides]]
kind = "Standard"

[slides.title]
type = "Empty"

[slides.body]
type = "Html"
raw = """
<div style="width:100%;height:100%;position:relative;display:flex;align-items:center;justify-content:center;">
  <img src="public/page_11.jpg" style="max-width:100%;max-height:100%;object-fit:contain;display:block;">
</div>
"""

[slides.notes]
type = "Empty"
Slide 12 — PDF page 12
Content:
12
DeFi Security Summit     |     Building Secure Contracts: Fuzzing like a pro
Invariant
•
Something that must
always be true
TOML code:
[[slides]]
kind = "Standard"

[slides.title]
type = "Empty"

[slides.body]
type = "Html"
raw = """
<div style="width:100%;height:100%;position:relative;display:flex;align-items:center;justify-content:center;">
  <img src="public/page_12.jpg" style="max-width:100%;max-height:100%;object-fit:contain;display:block;">
</div>
"""

[slides.notes]
type = "Empty"
Slide 13 — PDF page 13
Content:
13
DeFi Security Summit     |     Building Secure Contracts: Fuzzing like a pro
Echidna
TOML code:
[[slides]]
kind = "Standard"

[slides.title]
type = "Empty"

[slides.body]
type = "Html"
raw = """
<div style="width:100%;height:100%;position:relative;display:flex;align-items:center;justify-content:center;">
  <img src="public/page_13.jpg" style="max-width:100%;max-height:100%;object-fit:contain;display:block;">
</div>
"""

[slides.notes]
type = "Empty"
Slide 14 — PDF page 14
Content:
14
DeFi Security Summit     |     Building Secure Contracts: Fuzzing like a pro
Echidna
•
Smart contract fuzzer
Open source:
github.com/crytic/echidna
Heavily used in audits & mature
TOML code:
[[slides]]
kind = "Standard"

[slides.title]
type = "Empty"

[slides.body]
type = "Html"
raw = """
<div style="width:100%;height:100%;position:relative;display:flex;align-items:center;justify-content:center;">
  <img src="public/page_14.jpg" style="max-width:100%;max-height:100%;object-fit:contain;display:block;">
  <a href="https://github.com/crytic/echidna" target="_blank" rel="noopener"
     title="github.com/crytic/echidna"
     style="position:absolute;left:14%;top:41.8%;width:30.9%;height:5%;cursor:pointer;"></a>
</div>
"""

[slides.notes]
type = "Empty"
This slide has a clickable overlay — the URL is extracted from the PDF text and positioned as a transparent
<a>element on top of the image.
Slide 15 — PDF page 15
Content:
15
DeFi Security Summit     |     Building Secure Contracts: Fuzzing like a pro
Invariant - Token’s total supply
User balance never exceeds total supply
TOML code:
[[slides]]
kind = "Standard"

[slides.title]
type = "Empty"

[slides.body]
type = "Html"
raw = """
<div style="width:100%;height:100%;position:relative;display:flex;align-items:center;justify-content:center;">
  <img src="public/page_15.jpg" style="max-width:100%;max-height:100%;object-fit:contain;display:block;">
</div>
"""

[slides.notes]
type = "Empty"
Slide 16 — PDF page 16
Content:
16
DeFi Security Summit     |     Building Secure Contracts: Fuzzing like a pro
Echidna - Workflow
•
Write invariant as Solidity code
“User balance never exceeds total supply”
function echidna_balance_of_total_supply() public
returns(bool){
TOML code:
[[slides]]
kind = "Standard"

[slides.title]
type = "Empty"

[slides.body]
type = "Html"
raw = """
<div style="width:100%;height:100%;position:relative;display:flex;align-items:center;justify-content:center;">
  <img src="public/page_16.jpg" style="max-width:100%;max-height:100%;object-fit:contain;display:block;">
</div>
"""

[slides.notes]
type = "Empty"
Slide 17 — PDF page 17
Content:
17
DeFi Security Summit     |     Building Secure Contracts: Fuzzing like a pro
Echidna - Workflow
contract Token {
uint256 totalSupply;
mapping (address => uint256) balances;
function transfer(address to, uint256
amount) {
TOML code:
[[slides]]
kind = "Standard"

[slides.title]
type = "Empty"

[slides.body]
type = "Html"
raw = """
<div style="width:100%;height:100%;position:relative;display:flex;align-items:center;justify-content:center;">
  <img src="public/page_17.jpg" style="max-width:100%;max-height:100%;object-fit:contain;display:block;">
</div>
"""

[slides.notes]
type = "Empty"
Slide 18 — PDF page 18
Content:
18
DeFi Security Summit     |     Building Secure Contracts: Fuzzing like a pro
Echidna - Demo
pragma solidity 0.7.0;
contract Token{
mapping(address => uint) public balances;
function transfer(address to, uint value) public{
balances[msg.sender] -= value;
TOML code:
[[slides]]
kind = "Standard"

[slides.title]
type = "Empty"

[slides.body]
type = "Html"
raw = """
<div style="width:100%;height:100%;position:relative;display:flex;align-items:center;justify-content:center;">
  <img src="public/page_18.jpg" style="max-width:100%;max-height:100%;object-fit:contain;display:block;">
</div>
"""

[slides.notes]
type = "Empty"
Slide 19 — PDF page 19
Content:
19
DeFi Security Summit     |     Building Secure Contracts: Fuzzing like a pro
Echidna - Demo
pragma solidity 0.7.0;
contract TestToken is Token {
address echidna_caller = msg.sender;
constructor() public {
balances[echidna_caller] = 10000;
TOML code:
[[slides]]
kind = "Standard"

[slides.title]
type = "Empty"

[slides.body]
type = "Html"
raw = """
<div style="width:100%;height:100%;position:relative;display:flex;align-items:center;justify-content:center;">
  <img src="public/page_19.jpg" style="max-width:100%;max-height:100%;object-fit:contain;display:block;">
</div>
"""

[slides.notes]
type = "Empty"
Slide 20 — PDF page 20
Content:
20
DeFi Security Summit     |     Building Secure Contracts: Fuzzing like a pro
Echidna - Demo
https://github.com/crytic/building-secure-contracts/blob/master/program-analysis/echidna/Exercise-1.md
TOML code:
[[slides]]
kind = "Standard"

[slides.title]
type = "Empty"

[slides.body]
type = "Html"
raw = """
<div style="width:100%;height:100%;position:relative;display:flex;align-items:center;justify-content:center;">
  <img src="public/page_20.jpg" style="max-width:100%;max-height:100%;object-fit:contain;display:block;">
  <a href="https://github.com/crytic/building-secure-contracts/blob/master/program-analysis/echidna/Exercise-1.md" target="_blank" rel="noopener"
     style="position:absolute;left:9%;top:78%;width:77.2%;height:3.1%;cursor:pointer;"></a>
</div>
"""

[slides.notes]
type = "Empty"
This slide has a clickable overlay — the URL is extracted from the PDF text and positioned as a transparent
<a>element on top of the image.
Slide 21 — PDF page 21
Content:
21
DeFi Security Summit     |     Building Secure Contracts: Fuzzing like a pro
Echidna - Workflow
pragma solidity 0.7.0;
contract Token {   //address(0x0)       1
function transfer(address to, uint value)
public{
balances[msg.sender] -= value;
TOML code:
[[slides]]
kind = "Standard"

[slides.title]
type = "Empty"

[slides.body]
type = "Html"
raw = """
<div style="width:100%;height:100%;position:relative;display:flex;align-items:center;justify-content:center;">
  <img src="public/page_21.jpg" style="max-width:100%;max-height:100%;object-fit:contain;display:block;">
</div>
"""

[slides.notes]
type = "Empty"
Slide 22 — PDF page 22
Content:
22
DeFi Security Summit     |     Building Secure Contracts: Fuzzing like a pro
How to define good invariants
TOML code:
[[slides]]
kind = "Standard"

[slides.title]
type = "Empty"

[slides.body]
type = "Html"
raw = """
<div style="width:100%;height:100%;position:relative;display:flex;align-items:center;justify-content:center;">
  <img src="public/page_22.jpg" style="max-width:100%;max-height:100%;object-fit:contain;display:block;">
</div>
"""

[slides.notes]
type = "Empty"
Slide 23 — PDF page 23
Content:
23
DeFi Security Summit     |     Building Secure Contracts: Fuzzing like a pro
Defining good invariants
•
Start small, and iterate
Steps
1.
Define invariants in English
TOML code:
[[slides]]
kind = "Standard"

[slides.title]
type = "Empty"

[slides.body]
type = "Html"
raw = """
<div style="width:100%;height:100%;position:relative;display:flex;align-items:center;justify-content:center;">
  <img src="public/page_23.jpg" style="max-width:100%;max-height:100%;object-fit:contain;display:block;">
</div>
"""

[slides.notes]
type = "Empty"
Slide 24 — PDF page 24
Content:
24
DeFi Security Summit     |     Building Secure Contracts: Fuzzing like a pro
Identify invariants
•
Sit down and think about what the contract is supposed to do
Write the invariant in plain English
TOML code:
[[slides]]
kind = "Standard"

[slides.title]
type = "Empty"

[slides.body]
type = "Html"
raw = """
<div style="width:100%;height:100%;position:relative;display:flex;align-items:center;justify-content:center;">
  <img src="public/page_24.jpg" style="max-width:100%;max-height:100%;object-fit:contain;display:block;">
</div>
"""

[slides.notes]
type = "Empty"
Slide 25 — PDF page 25
Content:
25
DeFi Security Summit     |     Building Secure Contracts: Fuzzing like a pro
Identify invariants: Maths
•
Math library
◦
Commutative property
▫
TOML code:
[[slides]]
kind = "Standard"

[slides.title]
type = "Empty"

[slides.body]
type = "Html"
raw = """
<div style="width:100%;height:100%;position:relative;display:flex;align-items:center;justify-content:center;">
  <img src="public/page_25.jpg" style="max-width:100%;max-height:100%;object-fit:contain;display:block;">
</div>
"""

[slides.notes]
type = "Empty"
Slide 26 — PDF page 26
Content:
26
DeFi Security Summit     |     Building Secure Contracts: Fuzzing like a pro
Identify invariants: tokens
•
ERC20.total_supply
◦
No user should have a balance > total_supply
ERC20.transfer:
TOML code:
[[slides]]
kind = "Standard"

[slides.title]
type = "Empty"

[slides.body]
type = "Html"
raw = """
<div style="width:100%;height:100%;position:relative;display:flex;align-items:center;justify-content:center;">
  <img src="public/page_26.jpg" style="max-width:100%;max-height:100%;object-fit:contain;display:block;">
</div>
"""

[slides.notes]
type = "Empty"
Slide 27 — PDF page 27
Content:
27
DeFi Security Summit     |     Building Secure Contracts: Fuzzing like a pro
Identify invariants: tokens
•
ERC20.total_supply
◦
No user should have a balance > total_supply
ERC20.transfer:
TOML code:
[[slides]]
kind = "Standard"

[slides.title]
type = "Empty"

[slides.body]
type = "Html"
raw = """
<div style="width:100%;height:100%;position:relative;display:flex;align-items:center;justify-content:center;">
  <img src="public/page_27.jpg" style="max-width:100%;max-height:100%;object-fit:contain;display:block;">
</div>
"""

[slides.notes]
type = "Empty"
Slide 28 — PDF page 28
Content:
28
DeFi Security Summit     |     Building Secure Contracts: Fuzzing like a pro
Write invariants in Solidity
•
Identify the target of the invariant
◦
Function-level invariant
▫
TOML code:
[[slides]]
kind = "Standard"

[slides.title]
type = "Empty"

[slides.body]
type = "Html"
raw = """
<div style="width:100%;height:100%;position:relative;display:flex;align-items:center;justify-content:center;">
  <img src="public/page_28.jpg" style="max-width:100%;max-height:100%;object-fit:contain;display:block;">
</div>
"""

[slides.notes]
type = "Empty"
Slide 29 — PDF page 29
Content:
29
DeFi Security Summit     |     Building Secure Contracts: Fuzzing like a pro
Function-level invariant
•
Inherit the target
Create function and call the targeted function
Use assert to check the property
contract TestMath is Math{
TOML code:
[[slides]]
kind = "Standard"

[slides.title]
type = "Empty"

[slides.body]
type = "Html"
raw = """
<div style="width:100%;height:100%;position:relative;display:flex;align-items:center;justify-content:center;">
  <img src="public/page_29.jpg" style="max-width:100%;max-height:100%;object-fit:contain;display:block;">
</div>
"""

[slides.notes]
type = "Empty"
Slide 30 — PDF page 30
Content:
30
DeFi Security Summit     |     Building Secure Contracts: Fuzzing like a pro
•
Require initialization
◦
Simple initialization: constructor or inheritance
Complex initialization: leverage your unit test/deployment scripts
etheno
TOML code:
[[slides]]
kind = "Standard"

[slides.title]
type = "Empty"

[slides.body]
type = "Html"
raw = """
<div style="width:100%;height:100%;position:relative;display:flex;align-items:center;justify-content:center;">
  <img src="public/page_30.jpg" style="max-width:100%;max-height:100%;object-fit:contain;display:block;">
</div>
"""

[slides.notes]
type = "Empty"
Slide 31 — PDF page 31
Content:
31
DeFi Security Summit     |     Building Secure Contracts: Fuzzing like a pro
System level invariant
contract TestToken is Token {
address echidna_caller =
0x00a329C0648769a73afAC7F9381e08fb43DBEA70;
constructor() public{
balances[echidna_caller] = 10000;
TOML code:
[[slides]]
kind = "Standard"

[slides.title]
type = "Empty"

[slides.body]
type = "Html"
raw = """
<div style="width:100%;height:100%;position:relative;display:flex;align-items:center;justify-content:center;">
  <img src="public/page_31.jpg" style="max-width:100%;max-height:100%;object-fit:contain;display:block;">
</div>
"""

[slides.notes]
type = "Empty"
Slide 32 — PDF page 32
Content:
32
DeFi Security Summit     |     Building Secure Contracts: Fuzzing like a pro
Where to focus?
TOML code:
[[slides]]
kind = "Standard"

[slides.title]
type = "Empty"

[slides.body]
type = "Html"
raw = """
<div style="width:100%;height:100%;position:relative;display:flex;align-items:center;justify-content:center;">
  <img src="public/page_32.jpg" style="max-width:100%;max-height:100%;object-fit:contain;display:block;">
</div>
"""

[slides.notes]
type = "Empty"
Slide 33 — PDF page 33
Content:
33
DeFi Security Summit     |     Building Secure Contracts: Fuzzing like a pro
Where to focus?
•
In practice: you don’t know where the bugs are
Code coverage vs behavior coverage
◦
Cover as many functions as possible or;
TOML code:
[[slides]]
kind = "Standard"

[slides.title]
type = "Empty"

[slides.body]
type = "Html"
raw = """
<div style="width:100%;height:100%;position:relative;display:flex;align-items:center;justify-content:center;">
  <img src="public/page_33.jpg" style="max-width:100%;max-height:100%;object-fit:contain;display:block;">
</div>
"""

[slides.notes]
type = "Empty"
Slide 34 — PDF page 34
Content:
34
DeFi Security Summit     |     Building Secure Contracts: Fuzzing like a pro
•
Try different strategies
◦
Behavior coverage first
▫
Focus on 1 or 2 components
TOML code:
[[slides]]
kind = "Standard"

[slides.title]
type = "Empty"

[slides.body]
type = "Html"
raw = """
<div style="width:100%;height:100%;position:relative;display:flex;align-items:center;justify-content:center;">
  <img src="public/page_34.jpg" style="max-width:100%;max-height:100%;object-fit:contain;display:block;">
</div>
"""

[slides.notes]
type = "Empty"
Slide 35 — PDF page 35
Content:
35
DeFi Security Summit     |     Building Secure Contracts: Fuzzing like a pro
•
Start simple, then think about composition, related behaviors,
etc…
◦
Can transfer and transferFrom be equivalent?
▫
TOML code:
[[slides]]
kind = "Standard"

[slides.title]
type = "Empty"

[slides.body]
type = "Html"
raw = """
<div style="width:100%;height:100%;position:relative;display:flex;align-items:center;justify-content:center;">
  <img src="public/page_35.jpg" style="max-width:100%;max-height:100%;object-fit:contain;display:block;">
</div>
"""

[slides.notes]
type = "Empty"
Slide 36 — PDF page 36
Content:
36
DeFi Security Summit     |     Building Secure Contracts: Fuzzing like a pro
•
Start simple, then think about composition, related behaviors,
etc…
◦
Can transfer and transferFrom be equivalent?
▫
TOML code:
[[slides]]
kind = "Standard"

[slides.title]
type = "Empty"

[slides.body]
type = "Html"
raw = """
<div style="width:100%;height:100%;position:relative;display:flex;align-items:center;justify-content:center;">
  <img src="public/page_36.jpg" style="max-width:100%;max-height:100%;object-fit:contain;display:block;">
</div>
"""

[slides.notes]
type = "Empty"
Slide 37 — PDF page 37
Content:
37
DeFi Security Summit     |     Building Secure Contracts: Fuzzing like a pro
Where to focus?
•
Building your own experience will make you more efficient over
time
Learn on how to think about invariants is a key component to
write better code
TOML code:
[[slides]]
kind = "Standard"

[slides.title]
type = "Empty"

[slides.body]
type = "Html"
raw = """
<div style="width:100%;height:100%;position:relative;display:flex;align-items:center;justify-content:center;">
  <img src="public/page_37.jpg" style="max-width:100%;max-height:100%;object-fit:contain;display:block;">
</div>
"""

[slides.notes]
type = "Empty"
Slide 38 — PDF page 38
Content:
38
DeFi Security Summit     |     Building Secure Contracts: Fuzzing like a pro
Demo
TOML code:
[[slides]]
kind = "Standard"

[slides.title]
type = "Empty"

[slides.body]
type = "Html"
raw = """
<div style="width:100%;height:100%;position:relative;display:flex;align-items:center;justify-content:center;">
  <img src="public/page_38.jpg" style="max-width:100%;max-height:100%;object-fit:contain;display:block;">
</div>
"""

[slides.notes]
type = "Empty"
Slide 39 — PDF page 39
Content:
39
DeFi Security Summit     |     Building Secure Contracts: Fuzzing like a pro
Demo
/// @notice Allow users to buy token. 1 ether = 10 tokens
/// @param tokens The numbers of token to buy
/// @dev Users can send more ether than token to be bought, to give gifts to the
team.
function buy(uint tokens...
TOML code:
[[slides]]
kind = "Standard"

[slides.title]
type = "Empty"

[slides.body]
type = "Html"
raw = """
<div style="width:100%;height:100%;position:relative;display:flex;align-items:center;justify-content:center;">
  <img src="public/page_39.jpg" style="max-width:100%;max-height:100%;object-fit:contain;display:block;">
</div>
"""

[slides.notes]
type = "Empty"
Slide 40 — PDF page 40
Content:
40
DeFi Security Summit     |     Building Secure Contracts: Fuzzing like a pro
Demo
•
buy is stateful
_valid_buy is stateless
◦
Start with it
TOML code:
[[slides]]
kind = "Standard"

[slides.title]
type = "Empty"

[slides.body]
type = "Html"
raw = """
<div style="width:100%;height:100%;position:relative;display:flex;align-items:center;justify-content:center;">
  <img src="public/page_40.jpg" style="max-width:100%;max-height:100%;object-fit:contain;display:block;">
</div>
"""

[slides.notes]
type = "Empty"
Slide 41 — PDF page 41
Content:
41
DeFi Security Summit     |     Building Secure Contracts: Fuzzing like a pro
Demo
•
What invariants?
function _valid_buy(uint desired_tokens, uint wei_sent) internal view{
uint required_wei_sent = (desired_tokens / 10) * decimals;
require(wei_sent >= required_wei_sent);
TOML code:
[[slides]]
kind = "Standard"

[slides.title]
type = "Empty"

[slides.body]
type = "Html"
raw = """
<div style="width:100%;height:100%;position:relative;display:flex;align-items:center;justify-content:center;">
  <img src="public/page_41.jpg" style="max-width:100%;max-height:100%;object-fit:contain;display:block;">
</div>
"""

[slides.notes]
type = "Empty"
Slide 42 — PDF page 42
Content:
42
DeFi Security Summit     |     Building Secure Contracts: Fuzzing like a pro
Demo
•
What invariants?
◦
If wei_sent is zero, desired_tokens must be zero
function _valid_buy(uint desired_tokens, uint wei_sent) internal view{
TOML code:
[[slides]]
kind = "Standard"

[slides.title]
type = "Empty"

[slides.body]
type = "Html"
raw = """
<div style="width:100%;height:100%;position:relative;display:flex;align-items:center;justify-content:center;">
  <img src="public/page_42.jpg" style="max-width:100%;max-height:100%;object-fit:contain;display:block;">
</div>
"""

[slides.notes]
type = "Empty"
Slide 43 — PDF page 43
Content:
43
DeFi Security Summit     |     Building Secure Contracts: Fuzzing like a pro
Demo
function assert_no_free_token(uint desired_amount) public {
require(desired_amount>0);
_valid_buy(desired_amount, 0);
assert(false); // this should never be reached
}
TOML code:
[[slides]]
kind = "Standard"

[slides.title]
type = "Empty"

[slides.body]
type = "Html"
raw = """
<div style="width:100%;height:100%;position:relative;display:flex;align-items:center;justify-content:center;">
  <img src="public/page_43.jpg" style="max-width:100%;max-height:100%;object-fit:contain;display:block;">
</div>
"""

[slides.notes]
type = "Empty"
Slide 44 — PDF page 44
Content:
44
DeFi Security Summit     |     Building Secure Contracts: Fuzzing like a pro
Demo
<Demo>
TOML code:
[[slides]]
kind = "Standard"

[slides.title]
type = "Empty"

[slides.body]
type = "Html"
raw = """
<div style="width:100%;height:100%;position:relative;display:flex;align-items:center;justify-content:center;">
  <img src="public/page_44.jpg" style="max-width:100%;max-height:100%;object-fit:contain;display:block;">
</div>
"""

[slides.notes]
type = "Empty"
Slide 45 — PDF page 45
Content:
45
DeFi Security Summit     |     Building Secure Contracts: Fuzzing like a pro
Demo
// 1
function assert_no_free_token(uint desired_amount) public {
require(desired_amount>0);
_valid_buy(desired_amount, 0);
assert(false); // this should never be reached
TOML code:
[[slides]]
kind = "Standard"

[slides.title]
type = "Empty"

[slides.body]
type = "Html"
raw = """
<div style="width:100%;height:100%;position:relative;display:flex;align-items:center;justify-content:center;">
  <img src="public/page_45.jpg" style="max-width:100%;max-height:100%;object-fit:contain;display:block;">
</div>
"""

[slides.notes]
type = "Empty"
Slide 46 — PDF page 46
Content:
46
DeFi Security Summit     |     Building Secure Contracts: Fuzzing like a pro
Comparison with similar tools
TOML code:
[[slides]]
kind = "Standard"

[slides.title]
type = "Empty"

[slides.body]
type = "Html"
raw = """
<div style="width:100%;height:100%;position:relative;display:flex;align-items:center;justify-content:center;">
  <img src="public/page_46.jpg" style="max-width:100%;max-height:100%;object-fit:contain;display:block;">
</div>
"""

[slides.notes]
type = "Empty"
Slide 47 — PDF page 47
Content:
47
DeFi Security Summit     |     Building Secure Contracts: Fuzzing like a pro
Other fuzzers
•
Inbuilt in dapp, brownie, foundry, ..
Might be easier for simple test, however
◦
Less powerful (e.g. not stateful in foundry)
TOML code:
[[slides]]
kind = "Standard"

[slides.title]
type = "Empty"

[slides.body]
type = "Html"
raw = """
<div style="width:100%;height:100%;position:relative;display:flex;align-items:center;justify-content:center;">
  <img src="public/page_47.jpg" style="max-width:100%;max-height:100%;object-fit:contain;display:block;">
</div>
"""

[slides.notes]
type = "Empty"
Slide 48 — PDF page 48
Content:
48
DeFi Security Summit     |     Building Secure Contracts: Fuzzing like a pro
Formal methods based approach
•
Manticore, KEVM, Certora, ..
Provide proofs, however
◦
More difficult to use
TOML code:
[[slides]]
kind = "Standard"

[slides.title]
type = "Empty"

[slides.body]
type = "Html"
raw = """
<div style="width:100%;height:100%;position:relative;display:flex;align-items:center;justify-content:center;">
  <img src="public/page_48.jpg" style="max-width:100%;max-height:100%;object-fit:contain;display:block;">
</div>
"""

[slides.notes]
type = "Empty"
Slide 49 — PDF page 49
Content:
49
DeFi Security Summit     |     Building Secure Contracts: Fuzzing like a pro
Echidna’s advantages
•
Echidna has unique additional advanced features
◦
Can target high gas consumption functions
Differential fuzzing
TOML code:
[[slides]]
kind = "Standard"

[slides.title]
type = "Empty"

[slides.body]
type = "Html"
raw = """
<div style="width:100%;height:100%;position:relative;display:flex;align-items:center;justify-content:center;">
  <img src="public/page_49.jpg" style="max-width:100%;max-height:100%;object-fit:contain;display:block;">
</div>
"""

[slides.notes]
type = "Empty"
Slide 50 — PDF page 50
Content:
50
DeFi Security Summit     |     Building Secure Contracts: Fuzzing like a pro
Conclusion
TOML code:
[[slides]]
kind = "Standard"

[slides.title]
type = "Empty"

[slides.body]
type = "Html"
raw = """
<div style="width:100%;height:100%;position:relative;display:flex;align-items:center;justify-content:center;">
  <img src="public/page_50.jpg" style="max-width:100%;max-height:100%;object-fit:contain;display:block;">
</div>
"""

[slides.notes]
type = "Empty"
Slide 51 — PDF page 51
Content:
51
DeFi Security Summit     |     Building Secure Contracts: Fuzzing like a pro
Conclusion
•
https://github.com/crytic/echidna
To learn more: github.com/crytic/building-secure-contracts
Start by writing invariants in English, then write Solidity properties
◦
TOML code:
[[slides]]
kind = "Standard"

[slides.title]
type = "Empty"

[slides.body]
type = "Html"
raw = """
<div style="width:100%;height:100%;position:relative;display:flex;align-items:center;justify-content:center;">
  <img src="public/page_51.jpg" style="max-width:100%;max-height:100%;object-fit:contain;display:block;">
  <a href="https://github.com/crytic/echidna" target="_blank" rel="noopener"
     style="position:absolute;left:14%;top:29.9%;width:37.5%;height:4.7%;cursor:pointer;"></a>
  <a href="https://github.com/crytic/building-secure-contracts" target="_blank" rel="noopener"
     style="position:absolute;left:28.9%;top:34.9%;width:47.1%;height:4.5%;cursor:pointer;"></a>
  <a href="https://jobs.lever.co/trailofbits" target="_blank" rel="noopener"
     style="position:absolute;left:22.8%;top:68%;width:31.8%;height:4.5%;cursor:pointer;"></a>
</div>
"""

[slides.notes]
type = "Empty"
This slide has a clickable overlay — the URL is extracted from the PDF text and positioned as a transparent
<a>element on top of the image.
How to serve
toboggan-server \
  "slides_ex/presentations/How to Fuzz Like a Pro/how-to-fuzz-like-a-pro.toml" \
  --public-dir "slides_ex/presentations/How to Fuzz Like a Pro/public" \
  --port 8081 --host 0.0.0.0
Use Cases
Toboggan decouples the computer running the presentation from the device controlling it. This unlocks scenarios that are impossible with a traditional setup.
Two presenters, one stage
You're presenting as a duo. The first speaker is at the podium, the second is on the other side of the stage — or in the audience. Passing the clicker across the room isn't an option.
- The server runs on the PC connected to the projector.
- One presenter uses the PC.
- The other opens the web client on their phone or tablet.
- Both can advance slides from their own device, wherever they are in the room.
No more saying "can you click for me?" or discreetly handing over the remote.
No remote? Your phone is enough
The room is equipped but there's no clicker, or its battery is dead. Toboggan turns any smartphone into a remote:
- Start the server on the PC connected to the projector.
- Open the web client on your phone.
- Walk the stage — advance, rewind, jump to any slide from your pocket.
No Bluetooth, no dongle, no special hardware.
Video cable is far from the podium
The HDMI / DisplayPort jack is at the back of the room, but you want to speak from the front. Stuck next to the projector desk? No:
- Set up the PC next to the projector (where the cable is).
- Move to the podium with your phone or tablet.
- Control slides wirelessly from where you're actually speaking.
Presenting without your own laptop
Laptop forgotten, dead battery, or a computer that refuses to cooperate on the day. No panic:
- Start the Toboggan server on a colleague's PC, a Raspberry Pi, or even a cloud VM.
- Open the web client on any device — phone, tablet, loaner — and present.
- Slides and terminal sessions run on the server, not on your device.
Also useful for embedded demos: you can launch SSH sessions from the server, run live commands, and control everything from your phone.
Training rooms and workshops
The instructor advances slides while each participant follows on their own screen:
- The server runs on the instructor's machine.
- The instructor controls the pace from their PC.
- Participants open the web client on their own device (phone, tablet, PC) and see the current slide.
- Everyone follows at their own pace without crowding around the instructor's screen.
Accessibility
A presenter with limited mobility can control the presentation from a comfortable position (sitting in the audience, from a wheelchair-mounted device, etc.) without needing to stand at the projector desk.
Q&A and live debugging sessions
During questions, the presenter can approach the audience while keeping control of the slides:
- Phone in pocket, advance slides to answer questions.
- Jump back to show a technical detail without returning to the desk.
Embedded terminals in slides
Toboggan lets you embed live terminal sessions directly in a slide. Useful for:
- Showing a fuzzer running in real time — the terminal updates live.
- Doing a live debug demo without switching windows.
- Letting remote participants interact with the same terminal from their browser.
The combination of "control slides from any device + embedded terminals" makes Toboggan especially well suited for technical conferences, training sessions, and duo presentations.
Presentation Format
Toboggan serializes talks as TOML using the Talk, Slide, Content, and TerminalConfig types from toboggan-core.
You can also pass a directory of Markdown files directly to
toboggan-server— the same parser fromtoboggan-cliconverts them on startup. See Creating Presentations.
Canonical shape
title = "My Talk"
date = "2026-05-30"
footer = "Optional footer"
head = "Optional HTML head fragment"

[[slides]]
kind = "Part"

[slides.title]
type = "Text"
text = "Part 1: Introduction"

[[slides]]
kind = "Standard"

[slides.title]
type = "Text"
text = "Welcome"

[slides.body]
type = "Text"
text = "Welcome to this presentation!"
Talk fields
| Field | Type | Required | Description |
|---|---|---|---|
title | String | Yes | Presentation title |
date | Date | Yes | Presentation date (YYYY-MM-DD) |
footer | String | No | Optional global footer |
head | String | No | Optional HTML inserted into the page head |
slides | Array | Yes | Ordered slide list |
Slide fields
| Field | Type | Required | Description |
|---|---|---|---|
kind | String | No | Cover, Part, or Standard |
title | Content | No | Slide title content |
body | Content | No | Slide body content |
notes | Content | No | Speaker notes |
style | Style | No | CSS classes or inline style |
terminals | Array | No | Embedded terminal configurations |
Content variants
Content is serialized as a tagged enum:
| Variant | Shape | Use |
|---|---|---|
Empty | omitted/default | No content |
Text | { "type": "Text", "text": "..." } | Plain text or Markdown text |
Html | { "type": "Html", "raw": "...", "alt": "..." } | Rich HTML with optional accessibility fallback |
Style fields
| Field | Type | Description |
|---|---|---|
classes | Array | CSS classes |
style | String | Inline CSS |
Embedded terminals
Slides can embed one or more terminal panes via TerminalConfig.
| Field | Type | Description |
|---|---|---|
cwd | String | Working directory |
theme | dark / light | Terminal theme |
cmd | String | Optional command to run |
The markdown parser recognizes terminal blocks like <!-- term: path/to/cwd --> and variants with :light or | command.
Time values
- Presentation dates use
YYYY-MM-DD. - Durations in other config structures serialize as human-readable strings such as
30s,2m, or1m 30s.
Configuration
Server configuration
toboggan-server accepts the following CLI options:
toboggan-server [OPTIONS] <TALK>

Options:
  --host <IP>                  Host to bind to [default: 127.0.0.1]
  --port <PORT>                Port to bind to [default: 8080]
  --max-clients <N>            Maximum number of WebSocket clients [default: 100]
  --heartbeat-interval-secs <N> Heartbeat interval [default: 30]
  --shutdown-timeout-secs <N>   Graceful shutdown timeout [default: 30]
  --cleanup-interval-secs <N>   Client cleanup interval [default: 60]
  --allowed-origins <LIST>      Comma-separated CORS origins
  --public-dir <DIR>            Static assets directory served at `/public/`
  --watch                      Reload the talk when the file changes
These options also read from environment variables:
| Variable | Description |
|---|---|
TOBOGGAN_HOST | Server bind host |
TOBOGGAN_PORT | Server bind port |
TOBOGGAN_MAX_CLIENTS | Maximum number of clients |
TOBOGGAN_HEARTBEAT_INTERVAL | Heartbeat interval in seconds |
TOBOGGAN_SHUTDOWN_TIMEOUT | Shutdown timeout in seconds |
TOBOGGAN_CLEANUP_INTERVAL | Cleanup interval in seconds |
TOBOGGAN_CORS_ORIGINS | Comma-separated list of allowed origins |
TOBOGGAN_PUBLIC_DIR | Optional public assets directory |
TOBOGGAN_WATCH | Enable watch mode |
Client configuration
toboggan-core exposes a reusable client config helper:
[client]
api_url = "http://localhost:8080"
websocket_url = "ws://localhost:8080/api/ws"

[client.retry]
max_retries = 10
initial_retry_delay = "1s"
max_retry_delay = "30s"
backoff_factor = 2.0
use_jitter = true
Logging
The server and clients use tracing. Set RUST_LOG to control verbosity:
RUST_LOG=info toboggan-server talk.toml
RUST_LOG=toboggan_server=debug toboggan-server talk.toml
RUST_LOG=toboggan_client=trace toboggan-tui http://localhost:8080
Crate Reference
This page gives a compact, code-oriented summary of the main crates in the workspace.
toboggan-core
Shared domain model used everywhere else.
Talk: presentation container withtitle,date, optionalfooter/head, andslides.Slide: slide body, notes, style, terminals, and kind (Cover,Part,Standard).Content: text/HTML content with accessibility-friendly alternatives.State: runtime presentation state (Init,Running,Done).Command/Notification: JSON protocol enums exchanged over WebSocket.ClientId,ClientInfo,TalkResponse,SlidesResponse: transport-facing types.Date,Duration,Timestamp: time helpers with serde support.
toboggan-cli
Converts a folder of Markdown/HTML sources into a serialized talk.
- Entry point:
cargo run -p toboggan-cli -- <slides-folder> -o output.toml - Supports output formats:
toml,json,yaml,html. - Reads
_cover.md,_part.md,<!-- pause -->, speaker notes, and terminal blocks. - Computes presentation statistics and prints slide titles plus duration estimates.
toboggan-server
Hosts the talk and coordinates connected clients.
- Entry point:
cargo run -p toboggan-server -- <talk.toml>orcargo run -p toboggan-server -- <slides-dir/> - Validates host/port, WebSocket heartbeat, cleanup timers, and optional public assets.
- Keeps presentation state in a shared
TobogganStatefacade. - Accepts
Registerbefore handling other commands and broadcasts notifications to all clients.
toboggan-client
Reusable async client layer for the different frontends.
- Builds
api_urlandwebsocket_urlfrom a host/port pair. - Provides retry behavior with exponential backoff and optional jitter.
- Reuses the same wire types from
toboggan-core.
toboggan-stats
Presentation metrics and duration calculations.
- Counts slides, parts, words, images, and notes.
- Estimates talk length with configurable speaking rate.
- Used by the CLI when it prints summary statistics.
toboggan-tui
Terminal user interface for live presenting.
- Uses
ratatui,crossterm, andtoboggan-client. - Sends navigation commands and renders the current state.
- Useful for SSH-based or terminal-only presentations.
toboggan-web
Browser frontend built with Vite and TypeScript.
- Dev scripts:
dev,build,preview,serve,lint,format,check. - Serves the presenter-facing UI in the browser.
- Talks to the same server protocol as the other clients.
toboggan-mobile
UniFFI bridge for Swift and Kotlin consumers.
- Produces
lib,cdylib, andstaticlibartifacts. - Includes helper binaries for UniFFI code generation.
- Bridges the Rust client/core logic to mobile apps.
toboggan-desktop
Separate workspace for the native desktop app.
- Uses
icedandwgpu. - Kept separate to avoid pulling heavy GPU dependencies into the main workspace build.
Architecture
Toboggan is a Rust workspace built around a shared core model, a stateful server, and multiple thin clients.
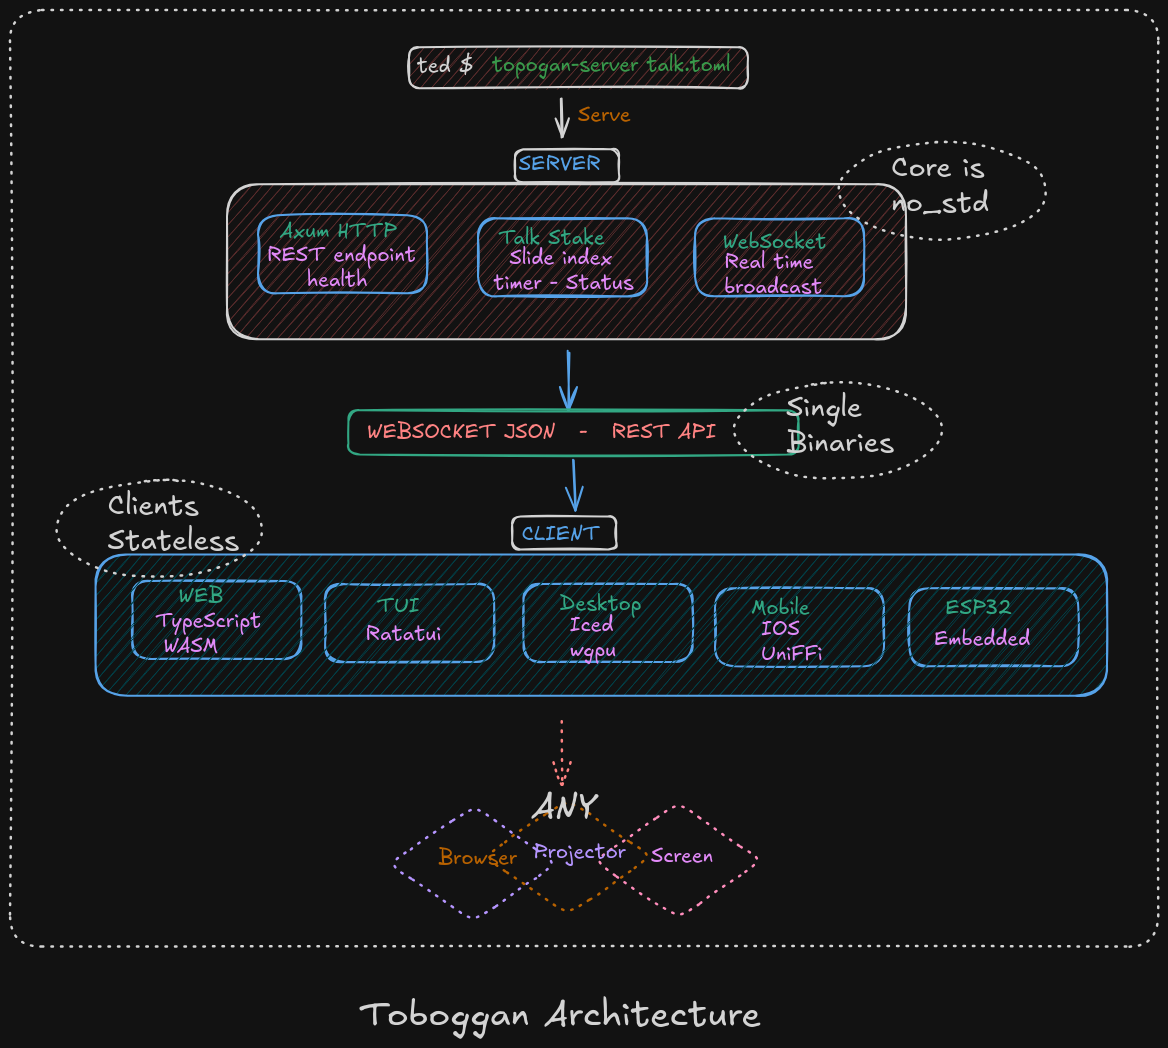
Workspace shape
| Crate | Role |
|---|---|
toboggan-core | Shared domain model: talks, slides, commands, notifications, timestamps, durations |
toboggan-server | Axum server, presentation state owner, WebSocket broadcast hub |
toboggan-cli | Folder-to-presentation converter and statistics reporter |
toboggan-client | Async client helpers for HTTP + WebSocket connections |
toboggan-tui | Terminal presenter/client based on ratatui |
toboggan-web | Browser UI built with TypeScript and Vite |
toboggan-mobile | UniFFI bindings for Swift and Kotlin consumers |
toboggan-stats | Word counts, duration estimates, and presentation metrics |
toboggan-desktop | Separate iced/wgpu desktop app workspace |
How the pieces fit together
flowchart LR
	author[Author / source folder] --> cli[toboggan-cli]
	author --> server[toboggan-server]
	cli --> talk[(TOML talk file)]
	talk --> server
	server --> core[toboggan-core]
	server --> stats[toboggan-stats]
	server --> clientlib[toboggan-client]
	clientlib --> tui[toboggan-tui]
	clientlib --> web[toboggan-web]
	clientlib --> mobile[toboggan-mobile]
	clientlib --> desktop[toboggan-desktop]
Runtime responsibilities
toboggan-coreowns the shape of the data and protocol messages.toboggan-cliturns a source folder into a serialized talk and prints useful statistics.toboggan-serverloads the talk, validates config, serves HTTP endpoints, and broadcasts WebSocket notifications.toboggan-clienthandles connection setup, retries, and protocol messages shared by several frontends.toboggan-statscomputes duration estimates and word counts from the parsed talk.toboggan-web,toboggan-tui,toboggan-mobile, andtoboggan-desktopare presentation clients that mostly render state and send commands.
Protocol shape
The protocol is JSON over WebSocket and uses the shared enums from toboggan-core:
- Client commands:
Register,Unregister,Ping,First,Last,GoTo,NextSlide,PreviousSlide,NextStep,PreviousStep,Blink - Server notifications:
State,Error,Pong,Blink,TalkChange,Registered,ClientConnected,ClientDisconnected
Why the workspace is split
- The core/server/cli/client crates stay relatively light and compile quickly.
- Desktop is isolated in a separate workspace because
icedandwgpusignificantly increase compile time and memory usage. - Web, mobile, and terminal clients can all reuse the same core protocol and data model.
Developer Overview
This document summarizes Toboggan's architecture, main crates, core types, runtime model, and how to build and extend the project.
Project at a glance
- Multi-platform presentation system written in Rust
- Real-time synchronization via WebSockets
- Organized as a main workspace (fast build) and a separate
toboggan-desktopworkspace (heavier GPU deps)
Workspace layout
toboggan-core— Core domain types:Talk,Slide,Content,State,Command,Notification.toboggan-cli— Folder-to-presentation converter and presentation statistics tooling.toboggan-server— Axum-based WebSocket + REST server, state manager, client registry.toboggan-client— Shared WebSocket client utilities used by various clients.toboggan-tui— Terminal client based onratatuiandcrossterm.toboggan-web/toboggan-wasm— TypeScript frontend and optional WASM client.toboggan-mobile/TobogganApp— iOS/Android integration via UniFFI and SwiftUI frontend.toboggan-desktop— Separate workspace usingiced+wgpu(compiles independently).
Core concepts and types
Talk
- Container for a presentation:
title,date, optionalhead/footer, andslides: Vec<Slide>. Talk::new, builder-stylewith_date,with_footer,add_slide.
Slide and SlideId
Slidecontainskind,style,title,body,notes, and optionalterminals.SlideIdis a typed wrapper aroundusizewith helpers:FIRST,index(),prev(),display_number().
Content
- Enum representing slide content:
Empty,Text,Html { raw, alt, style }. - Helper constructors:
Content::text,Content::html,Content::html_with_alt.
Runtime State
- States:
Init,Running { current, current_step },Done { current, current_step }. - Helpers:
current(),current_step(),next(),previous(),is_first_slide(),is_last_slide(),update_slide().
Protocol: Command and Notification
Command(client→server):Register,Unregister,Ping, navigation (First,Last,GoTo,NextSlide,PreviousSlide),NextStep/PreviousStep, effects likeBlink.Notification(server→clients):State,Error,Pong,Blink,TalkChange,Registered,ClientConnected,ClientDisconnected.
Server runtime model
TobogganStatecomposesTalkServiceandClientServiceand coordinates commands and broadcasts.- WebSocket flow: clients
Register→ server sends initialState→ client exchangesCommands → serverhandle_command→ broadcastsNotifications. - Concurrency: async tasks per connection (watcher, sender, receiver, heartbeat). Shared state uses thread-safe services and channels.
CLI behavior highlights
toboggan-cliparses folders into slides, supports frontmatter TOML, progressive reveals via<!-- pause -->, speaker notes, and multiple output formats (TOML, JSON, YAML, HTML).- Provides presentation statistics and optional numbering of parts/slides.
Build & run (developer quick commands)
Backend (Rust only)
# Build main workspace (CLI + server + TUI)
cargo build

# Build server and run with example presentation
cargo run -p toboggan-server -- slides_ex/riir-flat-output.toml

# Convert a folder to a talk
cargo run -p toboggan-cli -- slides_ex/riir-flat.md -o /tmp/my-talk.toml

# Run terminal client
cargo run -p toboggan-tui -- --host localhost --port 8080
Web frontend (adds WASM + TypeScript)
cd toboggan-web/toboggan-wasm
wasm-pack build --target web --release

cd ..
npm install
npm run build

cd ..
cargo build -p toboggan-server   # re-embed with updated dist
Tests, formatting and linting
- Run tests:
cargo testorcargo nextest runfor parallel execution. - Format:
cargo fmt— Lints:cargo clippy.
Where to look in code
- Core types:
toboggan-core/src/(talk.rs,slide.rs,content.rs,state.rs,command.rs,notification.rs). - CLI:
toboggan-cli/src/(main.rs,lib.rs,parser/,output/). - Server:
toboggan-server/src/(router/,services/,state.rs,watcher.rs).
Next steps and contribution ideas
- Add more examples for the WASM and mobile clients.
- Expand OpenAPI coverage (feature
openapi) to document HTTP endpoints. - Add more integration tests that run server + headless client to validate protocol.